📓 1.1.2.4 CSS: Styling Text and Best Practices
I'll be the first to admit it: the web pages we've made so far are pretty ugly. Let's learn our first CSS, which stands for Cascading Style Sheets. They're called cascading because often a single element on a webpage will have multiple sources that style it, and CSS resolves those differences to create the style you see on the screen. But we'll get into more of that later.
Note: if trying to make something look pretty is your idea of an awful time, don't worry, this isn't a design course! We're going to learn enough about styling to get you to the point where you can apply styles that other people develop without having to do any design yourself. And if you love design and want to learn more, I'll point you in the right direction at the end of this section.
Styling Text in my-first-webpage with CSS
Let’s return to our my-first-webpage project folder. Go ahead and make a folder called css inside of your my-first-webpage project folder. Create a new file in that css folder called styles.css.
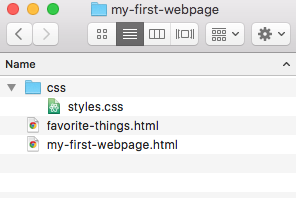
Here's what our my-first-webpage directory structure should look like now:
Linking Our HTML and CSS Files
Now the first thing we need to do is to tell our HTML document to use this file for its CSS. Note that the link below says css/styles.css because in relation to this favorite-things.html file, the styles.css file is in a subdirectory named css. If the styles.css file were in the same directory as the favorite-things.html file, then the link would just be to "styles.css" rather than to "css/styles.css".
<head>
  <link href="css/styles.css" rel="stylesheet" type="text/css">
  <title>Michael's favorite things</title>
</head>
I'm leaving out everything above and below the <head> tag for the sake of brevity.
Adding Our First CSS Rule
In our styles.css file, let's add our first bit of CSS:
h1 {
  color: blue;
}
Now, if we refresh the page, our heading is blue!
What we just wrote is called a CSS rule:
- The
h1part is called a selector, because it selects the HTML elements that the rule applies to. - The curly brackets
{ }indicate the start and end of the declaration block where we describe the styles of our CSS rule. coloris called a property, andblueis called a value.- The property and value together, like
color: blue, is called a declaration.
Note, every declaration block can have multiple declarations separated by a semicolon ;.
CSS Indentation and Spacing
Notice the indentation in the first rule we added: the property and value are indented two spaces, because they are inside the selector:
h1 {
  color: blue;
}
This follows the commonly held indentation and spacing convention for CSS, which has been determined to be the most readable. On your projects, your teachers will give you feedback on your CSS indentation and spacing based on whether or not it follows the common convention.
Examples of Poor CSS Indentation and Spacing
While we can write our CSS like this and get it to function:
/* This is poor indentation and spacing! Do not do this. */
h1{
color:blue;
}
Or like this:
/* This is poor indentation and spacing! Do not do this. */
h1 {color: blue;}
Neither example follows common indentation and spacing conventions.
Comments in CSS
You might be wondering about this syntax /* */ from the examples above:
/* This is poor indentation and spacing! Do not do this.*/
This is what a comment looks like in CSS. We first discussed comments in the lesson on HTML indentation, spacing, and comments. As a refresher, comments are messages for humans to read — the machine ignores them so they don't get run as code.
Developers use comments to describe what their code does in short messages. In general, your code should speak for itself. That means when someone looks at your code, it should be self-explanatory such that you don't need a comment to explain it. However, this won't always be the case! For CSS, it's common to use comments to identify groups of rules that apply to one feature on a webpage. For example, if your webpage has a menu and a footer with two separate styles, in your CSS, you might use comments to separate the rules that belong to each feature. (Another solution to this is to have separate CSS files for each feature, but more on this later.)
Developers also use comments to "comment out" code that they don't want the program to run. This can be helpful in troubleshooting bugs in your CSS. Generally speaking, you shouldn't leave large blocks of code commented out in your projects.
There is a shortcut for commenting code out in VS Code. Simply highlight what you'd like to comment (or uncomment) and then hold down Command + / on Macs and CTRL + / on Windows. This will comment out the code if it's not commented and uncomment it if it is commented. Also, VS Code will automatically use the correct syntax for commenting for the language you are using.
Adding More CSS Rules
Let's add some more rules:
h1 {
  color: blue;
  text-align: center;
}

h2 {
  font-style: italic;
  text-align: center;
}

p {
  font-family: sans-serif;
}

ul {
  font-size: 20px;
  line-height: 30px;
}
This should be mostly self-explanatory, but here are a couple notes.
px is short for pixels, which are a unit of measurement.
Sans Serif is a kind of font.
Named colors, like the blue we used for our h1, aren't used very commonly. Instead, it's more typical to use a three- or six-digit hexadecimal code like this:
h1 {
  color: #00f;
}
or like this:
h1 {
  color: #0000ff;
}
Both of these are equivalent to the named color blue. If you use a graphics program, it usually can tell you the hex code for the colors you're using. There are also a lot of online tools for picking colors and getting their hex codes.
The Strength of CSS: Changing Styles in Many Places at Once
Finally, you might be wondering why we made our <h2>s italic in CSS instead of just adding the <em>, like we did with this rule:
h2 {
  font-style: italic;
  text-align: center;
}
The reason is two-fold. First, we can modify the <em> tag just like any other HTML tag. Remember, <em> stands for emphasize, and at some point, we might decide that things that need emphasis should be bolded in addition to being italicized, which we might not want for our <h2>s. Second, one of the great advantages of CSS is that it makes it easy to change styles in many places at once. Let's say we use an <em> tag inside our <h2>s to make them italic. If we later change our mind and want them to be bold, we have to remove all of the <em> tags and replace them with <strong> tags. By using CSS instead, we only have to change the one CSS rule, and every single <h2> on every single web page that uses this CSS file will be updated.
My apologies for the long lecture, but this last point is really important. Building web sites is fundamentally different from building physical things. When you finish building a bridge, you're more or less done: there's not much you can change besides a coat of paint. But when you finish building a website, you've only just begun. There will be additions, deletions, changes, redesigns, and a whole lot more. CSS gives us some powerful tools to make it easier to change what we've built. If you remember nothing else, remember this: good code is code that is easy to change.
To see the beauty of using CSS, check out CSS Zen Garden. On the right side of the page, clicking one of the links will apply a different stylesheet to the same HTML. The page is totally transformed — no changes to the HTML needed. While experienced designers built these pages, they can also be a starting point for CSS in your own sites.
If you're following along and your CSS file isn't actually adding styles to your web page, see the next lesson, which introduces debugging.