📓 1.1.1.6 HTML Indentation, Spacing, and Comments
When you are writing HTML (or any other programming language), well-written code follows consistent indentation and spacing patterns. In some languages, indentation and spacing are even required for the code to function properly. While that's not the case with HTML or JavaScript, it's still very important to properly indent our code. Proper indentation makes our code cleaner and more readable. It also makes it easier to prevent bugs.
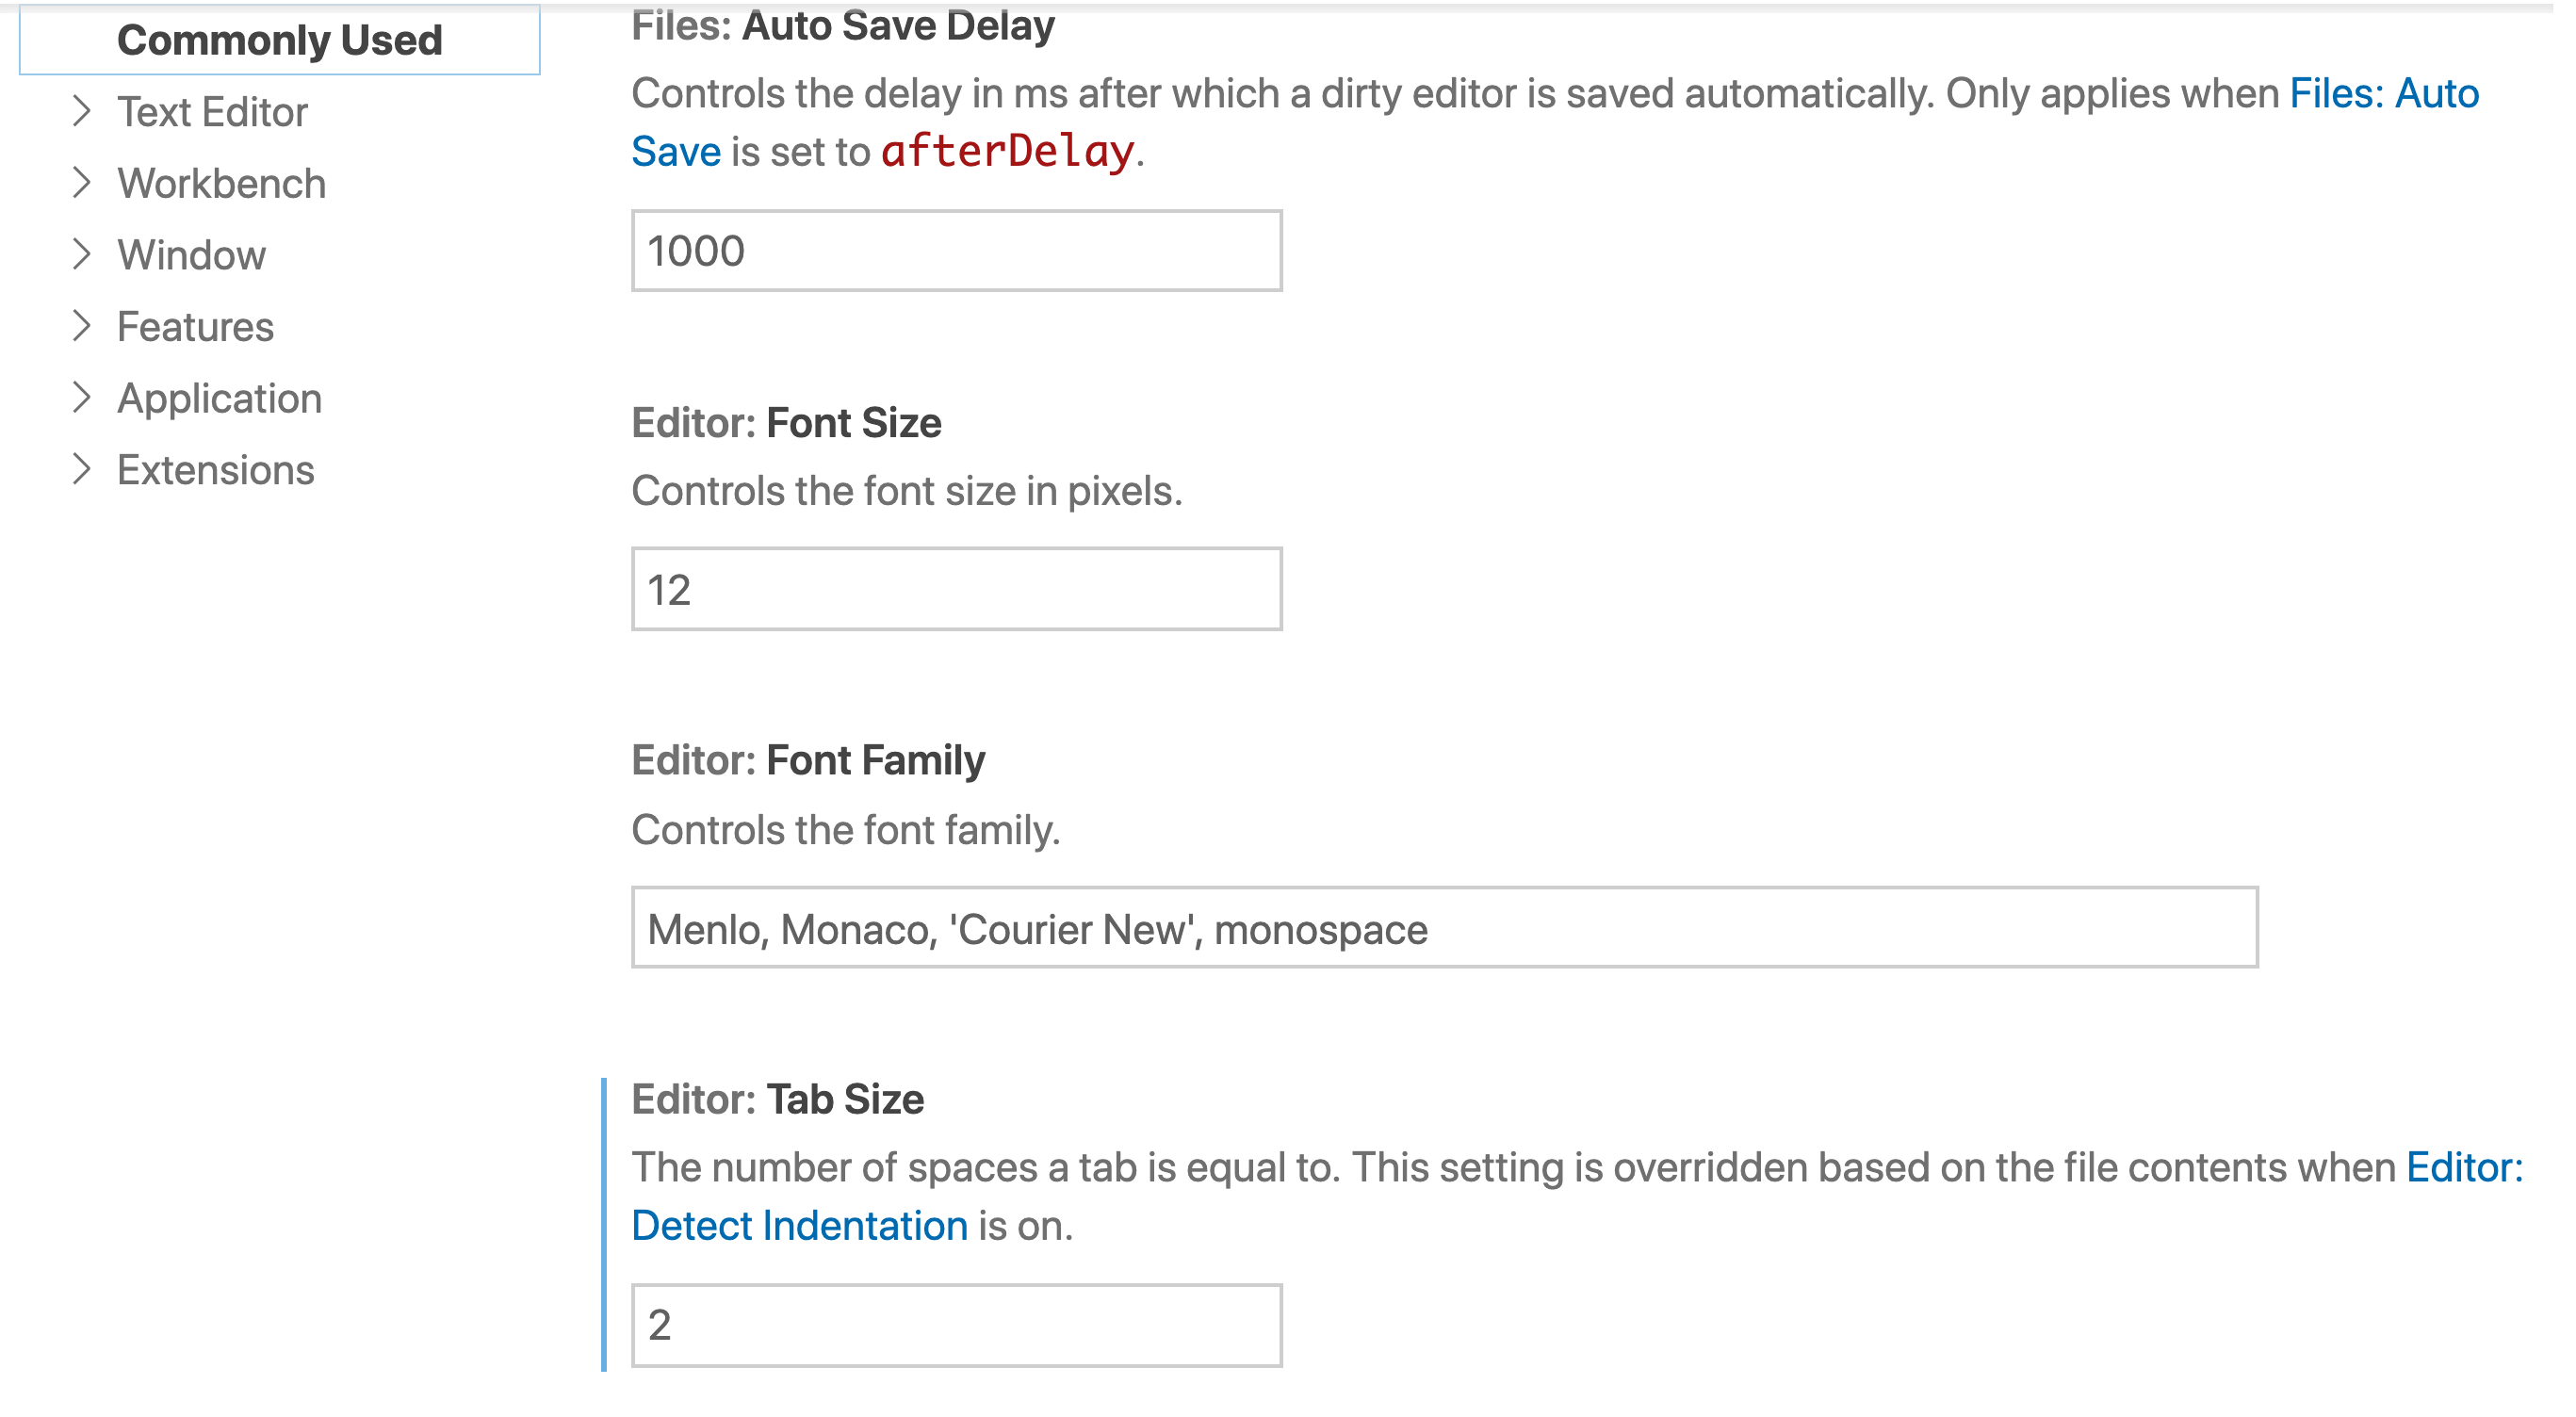
Adjusting VS Code Settings for Code Indentation
There are two debates around indentation in the coding community. The first debate is on whether we should use spaces or tabs to indent our code. The second is on whether our indents should equal 2 spaces or 4 spaces.
At Epicodus, we indent our code 2 spaces and use tabs instead of spaces for indentation. The default tab size in VS Code is 4 spaces so we need to update it. We can set the tab size by:
- Clicking the cog symbol in the lower left corner of VS Code and selecting Settings.
- Your settings should open to the Commonly Used options. If not, select Commonly Used from the menu.
- Within the Commonly Used settings, scroll until you find an option for Editor: Tab Size.
- Set the tab size to 2.
Make sure that you are updating User settings, and not only Workspace settings. Adjusting User settings saves your changes globally in VS Code.
Later in this lesson, we'll briefly discuss 2 versus 4 spaces and tabs versus spaces.
Indenting HTML
Let's take a look at what good HTML indentation looks like — and then we'll look at an example of poor indentation.
<!DOCTYPE html>
<html lang="en-US">
<head>
  <title>Example title</title>
</head>
<body>
  <h1>Example heading</h1>
  <h2>A smaller heading</h2>

  <p>Page content</p>
</body>
</html>
As we see here, when an HTML tag is nested inside another HTML tag, it's indented. There is one exception: we didn't indent <head> and <body> inside of the <html lang="en-US"> tag even though <head> and <body> are nested inside it. This is common convention to save space. As our code gets more deeply nested, there can be a lot of empty space in our code editor and eventually our code will end up running off the screen. This is why we are proponents of 2 spaces of indentation instead of 4 — to save space in our code editor.
By the way, note that we can do the <html> tag on its own — however, we will always add lang (in our case lang="en-US"). As we mentioned in the last lesson, this has two benefits: it provides better accessibility for screen readers for the visually impaired and it makes it easier for browser translation software to translate our HTML into other languages. We should make our sites more accessible if possible and this is an easy step we can make in that direction.
Now let's look at other examples of indentation in the HTML above. The <body> tag contains all of the HTML that a user sees on the page itself. Because all tags inside <body> are nested (such as <h1> and <h2>), they need to be indented two spaces more deeply than <body>.
However, note that the <h2> and <p> tags aren't indented past <h1>. This is because they aren't inside the <h1> closing tag (</h1>). We've found that some students are confused about this at first — and here's a common mistake we've seen from beginners:
<!-- This is not correct! Don't do this! -->
<h1>Here's a heading.</h1>
  <h2>Here's a smaller heading.</h2>
    <p>Here's some text.</p>
Organizationally, it kind of makes sense... but it's not correct.
An Aside About Comments...
By the way, you might be wondering about this syntax <!-- -->:
<!-- This is not correct! Don't do this! -->
This is called a comment. Most coding languages have the ability to add comments. Comments are messages for humans to read — the machine ignores them so they don't get run as code.
Developers use comments to describe what their code does in short messages. In general, your code should speak for itself. That means when someone looks at your code, it should be self-explanatory such that you don't need a comment to explain it. However, this won't always be the case! As a rule, anytime you have a section of code that can't be understood without an explanation, add in a short and descriptive comment. At the same time, you should avoid having too many comments or comments that are very lengthy. We'll revisit the topic of comments throughout the program as we learn new coding languages.
Developers also use comments to "comment out" code that they don't want the program to run. This can be helpful in troubleshooting bugs. Generally speaking, you shouldn't leave large blocks of code commented out in your projects.
Note that the syntax for HTML comments <!-- --> is different than the syntax of comments in other languages. We won't worry about other languages yet, though!
There is a shortcut for commenting code out in VS Code. Simply highlight what you'd like to comment (or uncomment) and then hold down Command + / on Macs and CTRL + / on Windows. This will comment out the code if it's not commented and uncomment it if it is commented. Also, VS Code will automatically use the correct syntax for commenting for the language you are using.
Example of Poor Indentation
Let's get back to indentation. We've looked at an example of good indentation and one common mistake that beginners make. Now let's look at an example of bad indentation. See if you can fix it on your own. Then we'll go over what's wrong and how to fix it.
<!DOCTYPE html>
<html lang="en-US">
    <head>
    <title>Example title</title>
    </head>
  <body>
      <h1>Example heading</h1>
        <h2>A smaller heading</h2>
          <p>Page content</p>
  </body>
</html>
Now let's take a closer look line by line at the issues:
<head>is indented 4 spaces. As we discussed in the previous example, we save space by not indenting<head>.<body>has the same problem — we won't be indenting that, either.- Currently,
<title>is not indented further than<head>even though it's nested inside<head>. It needs to be indented 2 more spaces than<head>. We don't actually have to change its position, though, because it will be indented correctly once the issue with the<head>tag is fixed. - The
<h1>is nested 4 spaces more deeply than the<body>tag. We need to be consistent when applying spacing. We are using 2 spaces of indentation so 4 spaces is inconsistent. <h2>is nested more deeply than<h1>even though it isn't inside the<h1>closing tag.<h2>should be at the same level as<h1>— and for that matter, so should the<p>tag.
Spacing
HTML ignores most whitespace. This could be a new line (or multiple new lines) or an extra space in your text or HTML tag. Let's look at examples of different forms of whitespace that are ignored in HTML.
In this first example, the spaces between the two lines of text will be ignored:
<p>Here's some text.</p>


<p>Here's more text.</p>
In this next example, the spaces before and after the text (the content of the <h1> element) will be ignored. This means the space after the opening <h1> tag and before the start of "Here's", and the space after the period "." and before the start of the closing </h1> tag. See the image below, underlining the extra whitespace in orange.
<h1> Here's a heading. </h1>

In this last example, there are extra spaces in each <p> tag (both the opening and closing tags) before the closing angle bracket >. Both of these whitespaces will be ignored. See the image below, underlining the extra whitespace in green.
<p >The `<p>` element represents a paragraph.</p >

More Examples of Whitespace in HTML
Let's consider a more extreme comparison of different uses of whitespace in HTML. Take a look at the three examples below of the same HTML. Each example will render the exact same in the browser, because it contains the same HTML. However, each example will look radically different because of how whitespace is used.
Example 1
<!DOCTYPE html><html lang="en-US"><head><title>Example title</title></head><body><h1>Example heading</h1><p>Page content</p><h2>A smaller heading</h2><p>Page content</p></body></html>
Example 2
        <!DOCTYPE html>
<html lang="en-US">
    <head>


    <title  > Example title </title>


  </head >

  <body  >
    <h1 > Example heading      </h1  >
    <p>Page content</p>


    <h2 > A smaller heading </h2  >

    <p>    Page content  </p    >


  </body>
</html>
Example 3
<!DOCTYPE html>
<html lang="en-US">
  <head>
    <title>Example title</title>
  </head>
  <body>
    <h1>Example heading</h1>
    <p>Page content</p>

    <h2>A smaller heading</h2>
    <p>Page content</p>
  </body>
</html>
Which example do you find is the easiest to understand and read? I'm hoping that you've selected example #3. If not, imagine expanding examples #1 and #2 to HTML documents with 500 lines of code — would either still be the easiest to understand and read?
In example #3, because of how the HTML is indented and spaced, we can easily get an overview of what is happening in the document and see which tags are nested in other tags. There's no extra whitespace that we need to sift through, and there's just enough indentation to understand the relationships between HTML elements and their content.
Whitespace and Best Practices for Code Readability
Proper use of whitespace in your HTML is directly related to how readable your code is to other people. As you write HTML, we suggest that you follow these best practices:
1. Only include necessary whitespace in your HTML elements and content. In other words, limit the unnecessary whitespace in your HTML. This means taking HTML that looks like <p > Here is some text. </p > and changing it to <p>Here is some text.</p>.
2. Do not include more than one blank line between any two lines of code. In large HTML documents, it's helpful to separate different sections of your HTML with blank lines. Doing this can help you visualize how the HTML will appear in the browser, in different sections of the webpage. When you do this, make sure you only use one blank line between any two lines of code. Excessive blank lines can make an HTML document harder to read.
3. Be consistent and follow convention. The style conventions will change based on the organization you are with, the language you are working with, and your personal preference. For example, you may prefer to use more whitespace because it helps you better read and understand your code, whereas the company you work for may expect you follow a specific style convention. Also, some languages use whitespace deliberately in their syntax, and your code could break if you use it incorrectly.
While you are at Epicodus, we expect you to follow the best practices listed in this section. On your projects, your teachers will give you feedback based on these best practices.
Tabs Versus Spaces... 2 Spaces Versus 4
Now that we've covered the basics of indentation and spacing, let's briefly get into the debate about tabs versus spaces and 2 spaces versus 4 when it comes to indentation. All of these choices are valid — though the TV show Silicon Valley (a satire about computer programmers) turned spaces versus tabs into both a joke and a heated debate. So let's look at the pros and cons of both — and why Epicodus does things one way and not the other.
Tabs Versus Spaces
The argument in favor of tabs is that it takes fewer keystrokes. A single tab will be consistent while you may accidentally press the space bar one too many — or one too few times — resulting in indentation issues. This is especially problematic for beginners, where it can be difficult to line up spaces correctly. That's why we recommend using tabs.
The argument against tabs is that different machines are configured differently. One developer's tab might be two spaces while another developer's tab might be four spaces. So a tab might mean one thing to one coder and a different thing to another. Meanwhile, a space is always a space.
2 Spaces Versus 4
The argument in favor of 2 spaces is that it takes up less space in your code editor — which can be especially useful on a laptop's smaller screen. There is more room for your code — and you'll be staring at less blank space. When a file has many levels of nesting (as you might see in a longer HTML document), your code won't run off the screen as much.
We know a lot of our students have smaller screens — and deeply nested code is often unavoidable in HTML documents. That's why we prefer 2 spaces.
The argument for 4 spaces is that code is more readable. The folks at Microsoft — and many C#/.NET developers — argue for 4 spaces. That is why VS Code has a default of 4 spaces. They argue that deeply nested code is a sign of badly-written code — so it shouldn't be going off your screen much anyway.
Ultimately, neither of these options are wrong. The most important thing is to be consistent everywhere in your code!
Regardless of the language you use to write code, learn the indentation and spacing standards for it. Practice consistency so that your code is easily readable to other developers as well as your future self.
Toggling Word Wrap in VS Code
For now, even with 2 space indentation, you will often find content in your code going off the screen. This can be very annoying. Fortunately, there's a setting in VS Code to ensure all your code is showing. Select the View dropdown menu from the top left menu bar in VS Code, then find the option for Word Wrap and make sure that it is selected (or checked). This forces the text in your screen to wrap inside the screen of your code editor. You can easily toggle it on or off. Occasionally, wrapping text can make it more difficult to see how code is indented — but it's generally a great tool for making sure you can see all of your code.