📓 3.4.0.4 The Rules of Hooks, Custom Hooks, and Why Hooks Are Awesome
In this lesson, we'll recap the best practices and rules of hooks. We'll also review why hooks are so beloved in the React developer community by explaining how hooks improve how we can reuse stateful logic in our apps. In the process, we'll write our own custom hook.
How to Use Hooks in a React Application
With the new power of being able to use state and lifecycle features in function components, you might wonder if how we structure our React applications should also change. The docs address this question in the Hooks FAQ:
Hooks are a more direct way to use the React features you already know — such as state, lifecycle, context, and refs. They don’t fundamentally change how React works, and your knowledge of components, props, and top-down data flow is just as relevant.
One common question is: should we add state in whichever component we feel needs it now? Not necessarily. As a rule, you should always think carefully about where you add state. In fact, React has a guide for this decision making and design process: Thinking in React. This guide covers creating a React application from the ground up, and there's three sections that cover state. We highly recommend that you revisit this document whenever you have questions about how to structure your React application.
As a quick review, here's the process we should follow when deciding where our state should live, according to the React docs:
For each piece of state in your application:
- Identify every component that renders something based on that state.
- Find a common owner component (a single component above all the components that need the state in the hierarchy).
- Either the common owner or another component higher up in the hierarchy should own the state.
- If you can’t find a component where it makes sense to own the state, create a new component solely for holding the state and add it somewhere in the hierarchy above the common owner component.
Rules of Hooks
There are two rules for using hooks:
- Only call hooks at the top level of a function component. Don’t call hooks inside loops, conditions, or nested functions.
- Only call hooks from React function components. Don’t call hooks from regular JavaScript functions (unless you are creating a custom hook — more on this soon!) or class components.
Applications that are bootstrapped with create-react-app come with an ESLint plugin for hooks that will warn you about misusing hooks. So, pay attention to your terminal output so that you can catch ESLint warnings about misused hooks.
For more detailed information, visit the React docs: Rules of Hooks.
Best Practices for Hooks
Other than the rules of hooks that we must follow, there are two best practices that we should also follow:
- Use multiple hooks to handle different concerns.
- For example, it's better to use multiple
useStatehooks to handle different state variables, instead of grouping them into oneuseStatehook. - You should also use multiple
useEffecthooks to manage different effects. Doing so practices separation of concerns and is a huge benefit with theuseEffecthook.
- Convention dictates that the name of custom hooks should start with "use", like
useStateoruseTimer. Later in this lesson, we'll create a custom hook calleduseTimer!
- Take note that the ESLint plugin for React hooks relies on this naming convention to identify hooks and any issues with them.
Why Hooks Are Awesome
Hooks solve two important problems in React development:
- Reusing stateful logic. If two components need the same stateful behavior — like a timer, or a live database connection — hooks let you extract that logic into a custom hook and share it across components without duplicating code.
- Organizing code by concern. Hooks let you group related logic together. For example, all the code for setting up and tearing down a database subscription can live in one
useEffectcall, rather than being scattered across a component.
If you'd like to read more about the motivation behind hooks, check out the Introducing Hooks page in the React docs.
To get a sense of just how easy this is to do, let's create our own custom hook. Afterwards, we'll briefly discuss the alternatives.
Turning Timer into a Custom Hook
For this example, we'll continue with our counter-app application and extract our stateful timer logic in our Timer component into a custom hook called useTimer. To do this, we'll make updates to Timer.js, and we'll also create a brand new useTimer.js file for our custom hook.
First, go ahead and create a new folder within the src folder called hooks and a file within it called useTimer.js. Note that React isn't very opinionated about how we organize our folders and files, so we don't have to have a hooks folder with our custom hooks inside. Generally speaking, whatever naming you choose should be intuitive and your folders shouldn't nest too deeply. If you want to read more on this topic, checkout this reference on File Structure.
Here's the starter code that we'll add to useTimer.js:
import { useState, useEffect } from 'react';

function useTimer() {
  // stateful logic for our timer will go here!
}

export default useTimer;
As we can see hooks are just JavaScript functions. We've imported the useState and useEffect hooks at the top of the file, because we'll use them in our timer logic.
So what stateful logic should we be extracting from Timer.js? Any code that sets up and manages our timer. We should not extract out code that handles setting the UI — because that's the job of the React component.
Here's the extracted code from Timer.js, added to useTimer.js:
import { useState, useEffect } from 'react';

function useTimer() {
  const [isActive, setIsActive] = useState(false);
  const [timer, setTimer] = useState(0);

  useEffect(() => {
    let interval;

    if (isActive) {
      interval = setInterval(() => {
        setTimer(timerState => timerState + 1)
      }, 1000);
    }

    return () => clearInterval(interval);
  }, [isActive]);
}

export default useTimer;
Our custom hooks can make use of any built-in React hooks, but as noted earlier, it shouldn't contain any UI logic.
And here's what Timer.js should now look like:
import React from 'react';
import useTimer from './hooks/useTimer';

function Timer() {
  return (
    <React.Fragment>
      {isActive ? <h1>{timer}</h1> : <h1>Timer Stopped</h1>}
      <button onClick={() => setIsActive(!isActive)}>Start/Stop</button>
    </React.Fragment>
  );
}

export default Timer;
At this point, we'll get a lot of compilation errors because Timer.js is rendering variables that don't exist! Specifically: isActive, timer, and setIsActive.
And while we've imported the useTimer hook at the top of Timer.js, we're not quite ready to use it because our useTimer hook doesn't return anything just yet.
So what should we return from our custom hook? Quite simply, any of the logic that we'll need in the Timer component. We can figure out what this is by looking at the variables used in the Timer component. As noted earlier, these variables are isActive, timer, and setIsActive. So, let's update our useTimer hook to return these variables.
import { useState, useEffect } from 'react';

function useTimer() {
  const [isActive, setIsActive] = useState(false);
  const [timer, setTimer] = useState(0);

  useEffect(() => {
    let interval;

    if (isActive) {
      interval = setInterval(() => {
        setTimer(timerState => timerState + 1)
      }, 1000);
    }

    return () => clearInterval(interval);
  }, [isActive]);

  // New line below!
  return [isActive, timer, setIsActive];
}

export default useTimer;
Just like with the useState hook, we're returning our variables in an array. We could choose an object instead, if that is preferable to structure your data.
Now, let's update our Timer.js component to use the useTimer hook:
import React from 'react';
import useTimer from './hooks/useTimer';

function Timer() {
  // New line below!
  const [isActive, timer, setIsActive] = useTimer();

  return (
    <React.Fragment>
      {isActive ? <h1>{timer}</h1> : <h1>Timer Stopped</h1>}
      <button onClick={() => setIsActive(!isActive)}>Start/Stop</button>
    </React.Fragment>
  );
}

export default Timer;
We destructure the three variables from the useTimer hook in the same order in which they are returned.
Take note that when we destructure values from an array we can name these variables whatever we want. For example:
import React from 'react';
import useTimer from './hooks/useTimer';

function Timer() {
  const [isOn, stopwatch, setIsOn] = useTimer();

  return (
    <React.Fragment>
      {isOn ? <h1>{stopwatch}</h1> : <h1>Timer Stopped</h1>}
      <button onClick={() => setIsOn(!isOn)}>Start/Stop</button>
    </React.Fragment>
  );
}

export default Timer;
And with that, we've successfully created a custom hook called useTimer! We can now import this hook into any component that we want to use a timer in. If we had three separate components, we could use the useTimer hook to create three separate timers, all with separate state. This is exactly what it means to reuse stateful logic, and hopefully you can agree that it was pretty easy to do with a custom hook.
To learn more about building custom hooks, visit the React docs on Building Your Own Hooks.
Before Hooks
For your awareness: here's what developers used before hooks existed for sharing stateful logic. You may encounter these patterns in older React codebases.
Prior to hooks, developers would use a combination of mixins, higher-order components, context, and render props. At this point, mixins are considered harmful, as detailed in the React blog post Mixins Considered Harmful. Higher-order components, context, and render props are all still in use in React, and they are each different tools that enable sharing code between two or more components. The issue with these tools is that they lead to "wrapper hell", where there's an excess of "wrapper" components that handle transferring data, but don't render anything to the UI.
Courtesy of reactjs.org, we can get a sense of what wrapper hell is by inspecting the component tree with our React DevTools:
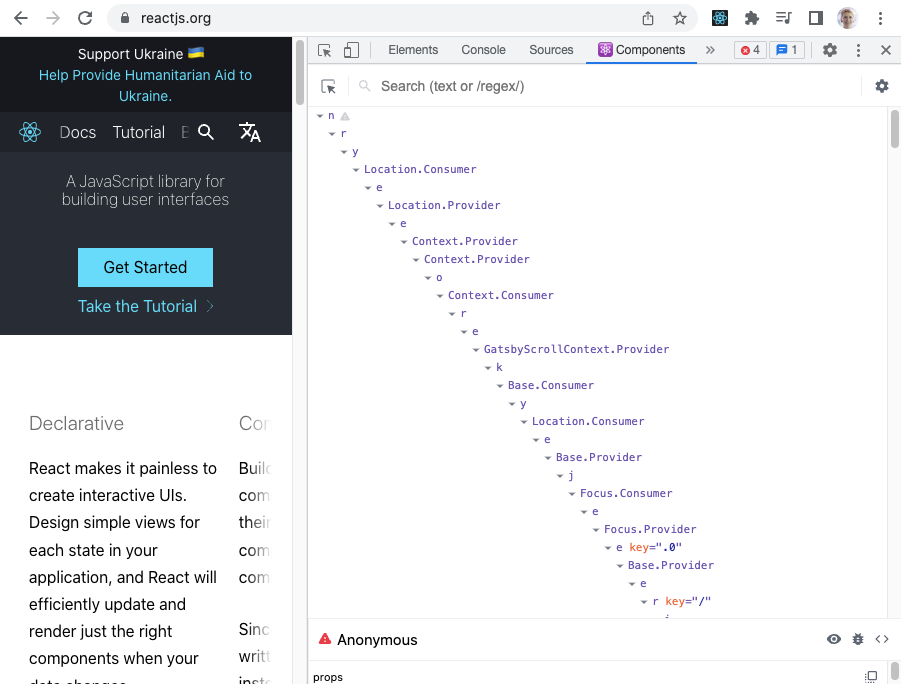
All of the components pictured are wrapper components that do not actually render anything in the page, but instead transfer data. The React docs offer a helpful description of what we are seeing:
If you look at a typical React application in React DevTools, you will likely find a “wrapper hell” of components surrounded by layers of providers, consumers, higher-order components, render props, and other abstractions.
The problem with "wrapper hell" is that it is hard to track the flow of data, which makes maintaining and debugging an application that much harder.
With hooks, we can extract data that we want to reuse in a function and import it directly into the components where we need to use that data. What's more, since hooks are just JavaScript functions, we aren't adding a component to our app's hierarchy of components when we share data via hooks.
And with that, we covered the very basics of why hooks are so awesome and beloved by the React community. You'll likely still have questions, like what is "render props"? For now, we'll leave that advanced topic to further exploration, so we can focus on hooks.
Next up, we'll return to our Help Queue application and plan how to connect it to Firebase.
There's Much More to Explore!
As always, there's much more to explore about hooks. To see a list of all built-in React hooks, check out this documentation:
To learn more about hooks in general, check out this documentation:
To review React main concepts, read this guide:
We suggest that you read about context, render props, and higher-order components later. If you are interested in finding more about these tools, look in the "Advanced Guides" section of the React docs.