📓 2.1.1.5 Address Book: Event Bubbling, Event Delegation, and the Event Object
At this point, we can dynamically add Contacts to our AddressBook and see their names appear in the DOM. However, what if we want to see additional details about each Contact? In this lesson, we'll add functionality so a user can click on a contact to see additional information such as a phone number. This is similar to how an address book in a smartphone might work — you click on the name to get more information about the contact.
Our new feature will allow us to hide and show information about a specific contact. To add this functionality, we'll explore two new concepts: event bubbling and event delegation.
Event Handling Review
As we've discussed previously, we can use event handlers to 'listen' for and react to events in the DOM. That event could be anything from a click to a keystroke to hovering over an element. When an event occurs, it will trigger any event handlers that are listening for that particular event. We've used both event handler properties and event listeners to create event handlers in our scripts.
We've mostly waited until the webpage has loaded to create any event handler. In the UI of every application we've created, we've done the following:
window.addEventListener("load", function() {
  // We create event handlers in here.
});
All the code inside the load event listener will run when the webpage has loaded all of its resources, including HTML, JS, CSS, and other files like images. We wait until the webpage has loaded all resources because we can only attach an event handler to a DOM element if the element already exists.
However, we're going to have to do things differently when we add contacts. That's because we don't add contacts until after the webpage has loaded. The code inside of the 'load' event handler will run as soon as the webpage is loaded, attaching additional event handlers as needed — but we can't add any event handlers to individual contacts because those contacts don't exist in the DOM yet.
That's why we'll need a different approach. And this approach is very important to understand if you want to be able to dynamically change things in the DOM when users do things, not just when the document has loaded.
Currently, when we create a new contact and display it in the DOM, we include an id attribute set to the contact's id property. We need to create an event listener that will trigger based on those dynamic IDs. In order to do this, we'll apply two concepts that are a bit more advanced — perhaps we could even call them intermediate JavaScript? Specifically, these two concepts are event bubbling and event delegation. Let's start with event bubbling.
Event Bubbling
Let's consider an example that uses an unordered list inside a div. This is for demonstration purposes only — we won't add this code to our address book!
<div id="parent-container">
  <ul id="list">
    <li id=1>1</li>
    <li id=2>2</li>
    <li id=3>3</li>
  </ul>
</div>
When we click a DOM element, it triggers an event. That event then bubbles upward. For example, when a user clicks on one of the <li>s in then code above, it triggers a click event. That click event bubbles upward to all the <li>'s parent elements in this order:
-
First, any click event handlers on the specific
<li>are triggered. -
Then, any click event handlers on the
<ul id="list">are triggered. This is one level "up" from the original<li>. -
Finally, any click handlers on the
<div id="parent-container">are triggered, because it's yet another level "up" from the<ul id="list">element. -
If the
<div id="parent-container">was wrapped in yet another element, like another div, any event listeners attached to that div would also trigger.
If we were to do something silly like attach an event listener that listens for clicks on the <body> element, clicking anything in the body of the document would eventually trigger that click handler. That's because all the elements inside the <body> of the document eventually 'bubble up' to <body>.
This process of hopping 'upward' to higher and higher level parent elements is called event bubbling or event propagation. We could write handlers for all three of these elements and each would be triggered in the order above. But this can actually create errors for new coders, particularly if they don't mean to trigger an event on a parent element.
Event Delegation in Address Book Application
We can use event bubbling to our advantage in our address book. Remember, we can only attach event handlers to DOM elements that exist. Our <li> elements don't exist yet when the DOM is created. However, its parent element <div id="contacts"> does! This means we can use event delegation in tandem with event bubbling to solve our problem and display details when a <li> is clicked.
Specifically, we can attach an event listener to a parent element that will fire for specified child elements. This is called event delegation. Let's add a new function to our address book to demonstrate how it works.
We'll create a new function called displayContactDetails() and we'll add it below our existing listContacts() function:
...

function displayContactDetails() {

}

...
We'll then call this function as soon as our webpage has loaded all resources:
...
window.addEventListener("load", function (){
  document.querySelector("form#new-contact").addEventListener("submit", handleFormSubmission);
  // The line below this one is new!
  document.querySelector("div#contacts").addEventListener("click", displayContactDetails);
});
What we've done is attach an event listener to the contacts div. The event listener is listening for click events on the div, which includes a click on anything inside of it.
Next, let's add some code to our displayContactDetails() function.
...

function displayContactDetails(event) {
  console.log("The id of this <li> is " + event.target.id + ".");
}

...
First, we make sure to create an event parameter so that we can access the Event object that's passed into the function when the click event is triggered.
Then, we log a message to the console that shows the value of the id attribute of the list item we clicked. We do this by accessing event.target.id, which we'll explore in detail below. For now, know that event.target represents the element that the event originated from. In our case, it's our <li> element that we click on inside of the contacts div, and the id property in event.target.id corresponds to the list item's id attribute.
If we load our page, populate a few contacts with our form, and click their <li>s, we'll see the id of the clicked <li> logged in the console! This is event delegation at work: we've attached the event listener to the parent element (the div), and this event listener is triggering when we click on child elements (any contact list item).
The result of harnessing event delegation in our code is twofold:
- We're able to create an event handler that reacts to clicks on elements that don't yet exist in the DOM.
- By accessing
event.target, we're able to write code based on the data of elements that do not yet exist, and do stuff with that data.
Event delegation is powerful stuff, and not too complicated to put to use in our code!
Before we complete the displayContactDetails() function, let's build some context around the Event object and the event.target property.
The Event Object
We've worked with the Event object before, so let's start with a little review before jumping into exploring event.target. Let's borrow some code from the handler function for our form's 'submit' event in the address book project.
function handleFormSubmission(event) {
  event.preventDefault();
  ...
  ...
}
What do we know about the event parameter and event.preventDefault() so far?
- We can add the
eventparameter to access theEventobject that's automatically created and passed into our event handler function. This happens implicitly, so it's hard to track because we don't see it happen. In this case, we just need to accept that this happens. - The
Eventobject that's passed in represents a specific type of event. For our form submission event thisEventobject is specifically aSubmitEventobject. - Every
Eventobject has properties that we can access to get information about the event or to perform actions. So far, we've only used theEventobject to prevent the default action of 'submit' events, which is to refresh the page.
Notably, the only way to access the Event object is through the handler function that's attached to the event handler. No matter what event we're targeting, we can always add an event parameter to the handler function to access the details of the event.
With this review, let's dive a little deeper into the Event object, and explore some valuable tools and resources to help us understand all that the Event object has to offer.
The Event Object is a Web API, a part of the DOM
The Event object is another interface that makes up the Document Object Model (DOM). According to MDN:
The
Eventinterface represents an event which takes place in the DOM.
Most notably, the Event object represents an event generally speaking, and it includes the properties and methods that all events of any type have. One of these methods is preventDefault(), which we are familiar with. An example of two Event properties are:
currentTarget: refers to the element to which the event handler has been attached.target: identifies the element on which the event occurred.
We will primarily deal with the second property: target.
Before we get into that property, there's one more thing to cover: there are multiple object types that are based on the Event object type; these are the objects that represent specific events, like SubmitEvent that we mentioned recently.
Take a moment to visit the following link to see a list of all object types that represent specific events:
The process of an object like SubmitEvent being based on the Event object is simply another way of describing inheritance. So, just like we saw in previous course sections where a very specific object type like HTMLParagraphElement inherits from multiple other object types:
HTMLElementElementNodeEventTarget
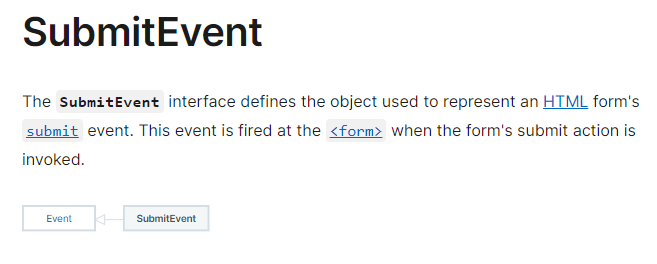
This same process of inheritance happens for the SubmitEvent object. In this case, SubmitEvent inherits from one other object type, Event. We can confirm this by looking at the SubmitEvent object on MDN, which contains a graphic that indicates that SubmitEvent inherits from Event:

EventTarget versus Event
It's easy to confuse Event and EventTarget, so here's a quick clarification:
- The
Eventobject (and any object types that inherit fromEvent) represents an event that takes place in the DOM. - The
EventTargetobject represents an object that can be the target of an event that we can call event listener methods on. The targets we've worked with arewindow,document, and HTML element objects.
Exploring Events by Logging Them to the Console
Other than using MDN documentation to explore event object types and their properties, there are a few tools we can use to explore events. The first one involves using a Chrome DevTools utility function to log all events that happen on an object type. Logging events in this way is helpful to visualize how often webpages are firing events, whether or not we have an event handler set up to react to them. Take note that this utility function will not work in other browsers, though other browsers' DevTools may have an equivalent utility function.
Open your DevTools console and enter in the following command:
> monitorEvents(window);
Then, move your mouse around the webpage. As you do this you'll see an explosion of logged messages to the console. All of these messages represent the events that are fired on the webpage as you move your mouse around the webpage! It's... a lot! But it also shows us the specific object types for each event, as well as the properties that are populated in those objects.
Take a moment to explore a few of these objects in your own DevTools console.
To end this barrage of logged messages, enter this command:
> unmonitorEvents(window);
We can get more specific in the events that we're logging by passing in different arguments, for example:
> monitorEvents(document, "click");
We could also get a specific HTML element object from the DOM (with document.querySelector() or another similar document method) and pass that object into the monitorEvents() DevTools utility function.
As mentioned earlier, this utility function is primarily helpful to visualize the events that happen in our browser's webpage, including the event object types and the properties they contain.
To learn more about the monitorEvents() DevTools utility function, visit this link.
Exploring Events with Breakpoints
A more targeted approach to exploring the events that we are handling in our projects is to use DevTools to explore the event type and its properties. Let's look at an example.
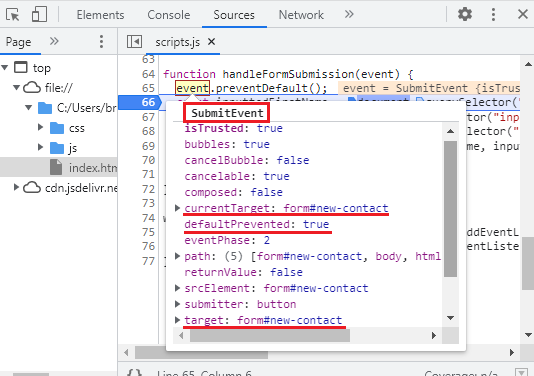
In the following image, I've added a breakpoint after the line event.preventDefault() in the Address Book's UI function handleFormSubmission(). When I hover over event in event.preventDefault(), a pop-up box appears with all of the information about the event:
- The specific object type,
SubmitEvent, highlighted in the red square - Its properties, including:
currentTarget: this is pointing to the<form>element that we attached the 'submit' event listener to.defaultPrevented: this is set to true, indicating that we've calledevent.preventDefault()in our code.target: this is pointing to the<form>element, because that is the element that the submit event originated from.

This is by far the easiest way to inspect an event in the context of our code. And since we're using a breakpoint to pause our code mid-execution, this means we can also switch to the DevTools console and explore the variables in scope.
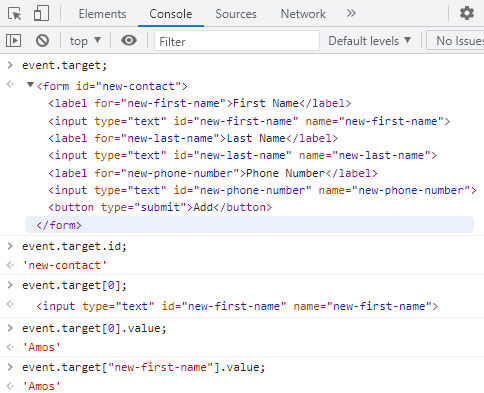
The following image above shows a few explorations of the event.target property.

This demonstrates a few things:
event.targetrepresents the actual HTML element object that the event occurred on. In this case, the<form>element.- Because
event.targetrepresents theHTMLFormElement, we can access the same properties we've learned to access before, like theidproperty withevent.target.id;. As a few more examples:- We could access inline styles with
event.target.style. - We could add a new attribute with
event.target.setAttribute("class", "test").
- We could access inline styles with
- We can also access the form inputs via
event.target:- With
event.target[0]we're accessing the first input element, and then withevent.target[0].value, we're accessing the first input's value. - Because we've included a
nameattribute on each input, we can access each input object via thenameattribute. For example, we've accessed the value of the first input element withevent.target["new-first-name"].value
- With
One thing to note is that the structure and contents of event.target will vary. The examples we've covered are just a few examples of the information you can access via event.target. When writing your own event handlers, the best recommendation we have is to explore the event object in the DevTools console to see if you can use any of the information.
For event delegation, the event.target property is invaluable, because it lets us access the element that the event occurred on. This allows us to write code using the data of elements that do not yet exist in the DOM.
Completing displayContactDetails()
Alright, we've covered the Event object, MDN documentation, and tools to explore event objects. Now it's time to complete our displayContactDetails() function. This function's purpose is to print the details of a contact object in our HTML. Let's take a look at the HTML we need to target:
<div id="contact-details" class="hidden">
  <h2>Contact Details:</h2>
  <p>First Name: <span class="first-name"></span></p>
  <p>Last Name: <span class="last-name"></span></p>
  <p>Phone Number: <span class="phone-number"></span></p>
</div>
Take note that we don't see this HTML in the DOM because of this code in our CSS:
#contact-details {
  display: none;
}
Given this, we'll need to make sure that displayContactDetails() does a few things:
- Finds the correct
Contactobject. - Prints the details of the
Contactobject in the DOM. - Shows the
"#contact-details"div.
Here's the updated displayContactDetails() function:
...

function displayContactDetails(event) {
  const contact = addressBook.findContact(event.target.id);
  document.querySelector(".first-name").innerText = contact.firstName;
  document.querySelector(".last-name").innerText = contact.lastName;
  document.querySelector(".phone-number").innerText = contact.phoneNumber;
  document.querySelector("div#contact-details").removeAttribute("class");
}

...
-
We start by utilizing our
AddressBook.prototype.findContact()method. Remember that we are cheating a bit and thataddressBookis global in scope, which is why we can use it here. -
We access the spans in the DOM to print the contact's first name, last name, and phone number.
-
Then, we show the hidden
#contact-detailsdiv with the contact's full information.
Now our application will be working correctly again. We can click on an <li> and see that contact's detail info appear in the DOM!
Resources to Explore on MDN
Note we have not covered all topics related to event bubbling: there's also a capturing phase and a target phase. Those topics are not vital to understand now, so we're leaving them to further exploration. To learn more, we recommend the following resources on MDN: