📓 4.2.0.7 Planning a React Application
Before we start coding our site, let's plan the UI for our Help Queue application. At this point, we aren't going to worry about adding or changing state in our application. Our site will be entirely static and we will only have function components. This is actually the recommended way to build a React site. State gets complicated fast. If we start adding state without planning our application first, we'll be much more likely to write bad code and end up with frustrating bugs.
In the React documentation, there is an article called Thinking in React that outlines the process of planning, building out a static site, and then finally adding state. We recommend taking a quick look at the steps in that article before continuing. We will be following the same process as we build out our Help Queue application.
Planning Our Application
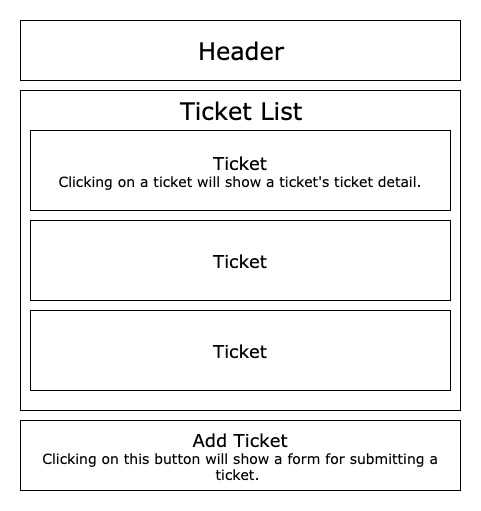
We will start by drawing a component diagram of our application. Our component diagram will provide a very general sense of how our application should look and act. It will specifically show the components we will need and how they will be structured in relation to other components. You will be expected to draw a component diagram of your application for this project.
We recommend using https://www.draw.io for component drawings. You can also use a whiteboard or paper and then take a picture. Your READMEs should always include a component diagram.
Here is a diagram of our Help Queue:

As our diagram demonstrates, our application will start with the following function components:
- Header: Our header will remain the same regardless of whether the user is looking at all tickets, a specific ticket, or the form for creating a new ticket.
This will be a very small component, which is exactly what we want. Remember, our goal is to compose our application of many smaller components, as opposed to fewer larger and cumbersome components.
Ticket List: This component will loop through all of our individual tickets, displaying them on the page. We will cover looping in JSX soon.
Ticket: We will also have a component for an individual ticket. Each ticket will have different properties passed into it (such as
name,issueandstation). As shown in the diagram above, theTicketcomponent will be nested insideTicketList, which means it will be theTicketListcomponent's child.Add Ticket: This will have a button for adding a ticket.
We won't worry about our ticket detail or form just yet.
Now that we've planned out our application's structure, we're ready to start coding our site!