📓 4.2.1.2 Introduction to State
In this lesson, we'll cover the concept of state in React and learn how to add state to our components using React's useState hook. Then, over the next several lessons, we'll add state to our Help Queue application so we can dynamically add new tickets.
A previous lesson briefly introduced both functional and class components. The remainder of this section focuses on functional components and the useState hook, which is the modern way to manage state in React.
What Is State?
We can use two types of data in a React component: props and state. We've already used props to pass data from parent components to child components.
State is anything in an application that we need to store and change. For instance, in our Help Queue, each time we add a new ticket, we need to update the application's state to hold the new ticket. Likewise, we'd need to update the application's state to edit or delete a ticket.
Here's the key difference: state can change, but props cannot. A component can modify its own state, but it cannot modify the props it receives. State is fluid and ever-changing; props are read-only.
Local State vs Shared State
There are two types of state in a React application: local state and shared state.
Local State
Local state lives in a single component and is never used in other components. It's simpler than shared state because we don't have to worry about passing data around.
A common example of local state is toggling visibility — like whether to show a form or a list. We'll use local state in our Help Queue to determine whether users see the ticket list or the "add ticket" form.
Where should local state live? Easy — in the component that needs it!
Shared State
Shared state is used by multiple components. For example, the main list of tickets in our Help Queue is shared state: the ticket list component needs it to display tickets, and the form component needs to add new tickets to it.
Where should shared state live? In the lowest common ancestor of all components that need it.
Here's what that means:
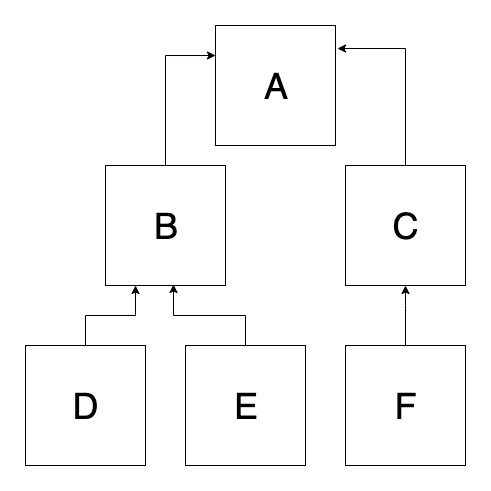
In this diagram, there are six components. If components D and E both need access to the same state, the lowest common ancestor is component B — so the state should live there.
But what if component F also needs that state? Now component B is no longer a common ancestor of all three. The lowest common ancestor of D, E, and F is component A, so we'd need to "lift" the state up to component A.
This concept of lifting state up will become clearer as we build our Help Queue.
The useState Hook
Now let's learn how to actually create state in a React component. React provides a built-in function called useState that lets us add state to function components.
Let's explore useState with a simple counter app. You don't need to code along, but you're welcome to.
Setting Up
Create a new React app:
npx create-react-app counter-app
Replace the code in src/App.js with this:
import './App.css';
import Counter from './Counter';

function App() {
  return (
    <div className="App">
      <Counter />
    </div>
  );
}

export default App;
Now create src/Counter.js:
import React, { useState } from 'react';

function Counter() {
  const [count, setCount] = useState(0);

  return (
    <React.Fragment>
      <h1>{count}</h1>
      <button onClick={() => setCount(count + 1)}>Count!</button>
    </React.Fragment>
  );
}

export default Counter;
That's it! With just a few lines of code, we have a working counter with state. Let's break down how it works.
How useState Works
const [count, setCount] = useState(0);
This single line does a lot:
-
useState(0)— We call theuseStatehook and pass in0as the initial value for thecountstate variable. We can initialize state with any data type: a number, string, boolean, array, object, ornull. -
useStatereturns an array with exactly two elements:- The current state value
- A function to update that value
-
We destructure the array into two variables:
count— the current value (starts at0)setCount— the function we'll call to updatecount
The naming convention is to name the updater function set + the state variable name. So count pairs with setCount, hidden would pair with setHidden, and so on.
If the destructuring syntax is unfamiliar, here's what it would look like without it:
const countState = useState(0);
const count = countState[0];
const setCount = countState[1];
The destructuring version is more concise, which is why it's standard practice.
Displaying and Updating State
In our JSX, we display the current count and create a button to increment it:
<h1>{count}</h1>
<button onClick={() => setCount(count + 1)}>Count!</button>
When the button is clicked, we call setCount(count + 1). This updates the count state to be one more than its current value.
React also re-renders the Counter component with the new state, because state updates trigger re-renders.
We use an arrow function () => setCount(count + 1) for the click handler. If we wrote onClick={setCount(count + 1)} without the arrow function, it would run immediately when the component renders, not when clicked!
Rules for Updating State
Never Modify State Directly
Always use the updater function. Never do this:
// ❌ DON'T DO THIS!
count = count + 1;
This won't work because React doesn't know the value changed. It won't re-render the component, so your UI won't update. Always use the setter function:
// ✅ Do this instead
setCount(count + 1);
State Updates Are Asynchronous
React batches state updates for performance. This means if you try to log state right after updating it, you might see the old value:
setCount(5);
console.log(count); // Might still show the old value!
The component will re-render with the new value, but the update doesn't happen instantly within your function. Keep this in mind when debugging!
Multiple State Variables
What if a component needs to track multiple pieces of state? You might be tempted to put everything in one object:
// This works, but isn't recommended
const [state, setState] = useState({ count: 0, hidden: false });
While this works, React recommends using separate useState calls for each piece of state:
import React, { useState } from 'react';

function Counter() {
  const [count, setCount] = useState(0);
  const [hidden, setHidden] = useState(false);

  return (
    <React.Fragment>
      {hidden ? <h1>Count Hidden</h1> : <h1>{count}</h1>}
      <button onClick={() => setCount(count + 1)}>Count!</button>
      <button onClick={() => setHidden(!hidden)}>Hide/Show</button>
    </React.Fragment>
  );
}

export default Counter;
This approach is better because:
- Each piece of state has its own clearly-named variable and updater
- It's easier to read and understand what state the component manages
- You can update one piece of state without worrying about the others
- It follows the principle of separation of concerns
The above example uses the ternary operator to render either the count or a "Count Hidden" message based on the hidden state. If hidden is true, it displays "Count Hidden"; otherwise, it shows the current count.
Summary
Here's what we covered:
- State is data that can change over time. Props cannot change; state can.
- Local state lives in one component. Shared state is used by multiple components and should live in their lowest common ancestor.
- The
useStatehook lets us add state to function components. useStatereturns an array:[currentValue, setterFunction].- Always update state using the setter function, never by direct assignment.
- Use separate
useStatecalls for separate pieces of state.
In the upcoming lessons, we'll apply these concepts to add both local and shared state to our Help Queue application.