📓 Interactivity with JavaScript and jQuery
While an alert() can be helpful for beginning programmers, we generally don't want to use them in our applications. Ideally, we want as much of our functionality to happen on the page as possible. In this lesson, we'll create a form where users can type in a goal. When the goal is submitted, it will then be added to our list of goals.
In order to do this, we're going to use a JavaScript library called jQuery. jQuery just uses JavaScript under the hood. We could do the exact same thing with just JavaScript but the purpose of jQuery is to make this interactivity much easier to work with in our code. A library in JavaScript is just like a CSS library like Bootstrap. It's a collection of already existing code that can help speed up our process.
Using JavaScript and jQuery
Adding Scripts to HTML
Before we start coding, we'll need to include links in our HTML file to both the jQuery library and a script for our JavaScript code. Fortunately, Glitch has already provided a JavaScript file called script.js so we don't need to create it ourselves.
Update the <head> element in index.html to look like this:
...
<head>
  <link
    href="https://cdn.jsdelivr.net/npm/bootstrap@5.2.3/dist/css/bootstrap.min.css"
    rel="stylesheet"
    integrity="sha384-rbsA2VBKQhggwzxH7pPCaAqO46MgnOM80zW1RWuH61DGLwZJEdK2Kadq2F9CUG65"
    crossorigin="anonymous" />
  <link rel="stylesheet" href="style.css">
  <script
  src="https://code.jquery.com/jquery-3.6.0.js"
  integrity="sha256-H+K7U5CnXl1h5ywQfKtSj8PCmoN9aaq30gDh27Xc0jk="
  crossorigin="anonymous"></script>
  <script src="script.js"></script>
  <title>Epicodus Workshop Project</title>
</head>
...
We've added two <script> tags to the <head> of our document. Note that scripts are not self-closing so we need to close them with </script>.
Both of these script tags have a src attribute. This is short for source and tells our HTML file where to find the files. The jQuery library is sourced from a URL while script.js is already available in our Glitch project. These JavaScript files will load from the top down. Because our script.js file will contain code that's dependent on jQuery, we need to include the jQuery library first.
Adding a Form to HTML
Next, let's create a form that will allow us to add new items to our list of programming goals. We'll put this form in our index.html file just above the <ul> that contains our list of goals.
...
  <div class="form-group">
    <label>New Goal</label>
    <input type="text" id="new-goal">
    <button class="btn" type="button" id="goal-button">Add goal</button>
  </div>
...
Notice how these HTML elements are indented to keep them organized? Good coding includes using good organization and conventions to help make these items easier to read. We won't cover indentation further here, but it's covered in the first few weeks of Introduction to Programming.
Our new form contains a label, a text input field for the user, and a button to click when the form has been filled out. Note the id given to the text input. That's about to become important.
We can enter a new goal into our form, but when we click the button, nothing happens. We'll need to use jQuery to make the button interactive.
TL;DR: We Need to Use jQuery to Make the Script Wait for Our HTML to Load
Before we go any further, let's discuss what actually happens when we load HTML on a webpage. What we see in the browser isn't actually HTML. It's what's called the DOM, which stands for Document Object Model. Our HTML is just a blueprint. It tells the browser what to do and then the browser creates a DOM based on that blueprint.
Why is this important? Well, the DOM needs to be built before we run our JavaScript code. Otherwise our JavaScript code won't run. If HTML is the blueprint, then the DOM is a virtual house built with that blueprint. We need the house to be finished before we can actually start doing stuff in it.
For that reason, our code is going to be wrapped in a jQuery function that is very common in scripts that are used for websites:
$(document).ready(function() {
  // Our code will go here.
});
Let's explain this in further detail:
- We begin by using the
$. All jQuery methods are preceded by this symbol. - We call the following jQuery method:
$(document).ready(). This ensures that the DOM is built first so our JavaScript code works. Otherwise, the JavaScript code will run immediately - before there's a DOM in place. - The
function()keyword comes from JavaScript. We are putting all of the code that should run inside this function. jQuery will then call that function after the document is ready. });is used to close a JavaScript function. Just like a CSS style, this curly-brace/parens combo closes theready()function and the area where we define those actions. An area of actions within a function is called that function's scope. The scope of our function doesn't have any code in it yet.
As a quick reference, a JavaScript function has this syntax:
function () {
  // All code goes here.
};
Using jQuery to Change the DOM
Now that we have a jQuery function that will make sure our script waits for the DOM to load before running, we can put some code in it.
We can target specific elements in our site by using the same classes and ids we've already added to our code for CSS rules. Let's change our script to the following:
$(document).ready(function() {
  $("#goal-list").append("I want to learn to code!");
});
Now let's break down our new line of code further:
$("#goal-list").append("I want to learn to code!");
- We start with the
$because we are using jQuery. - jQuery will then find the corresponding element with an ID of
goal-list. - We use jQuery's
append()function, which does exactly what it sounds like: adds something to the end of the targeted element. That could be a string, a number, or even an image. - Finally, we pass an argument into
append(): the string"I want to learn to code!".
Let's take a look at what happens when we add this code to our Glitch application:
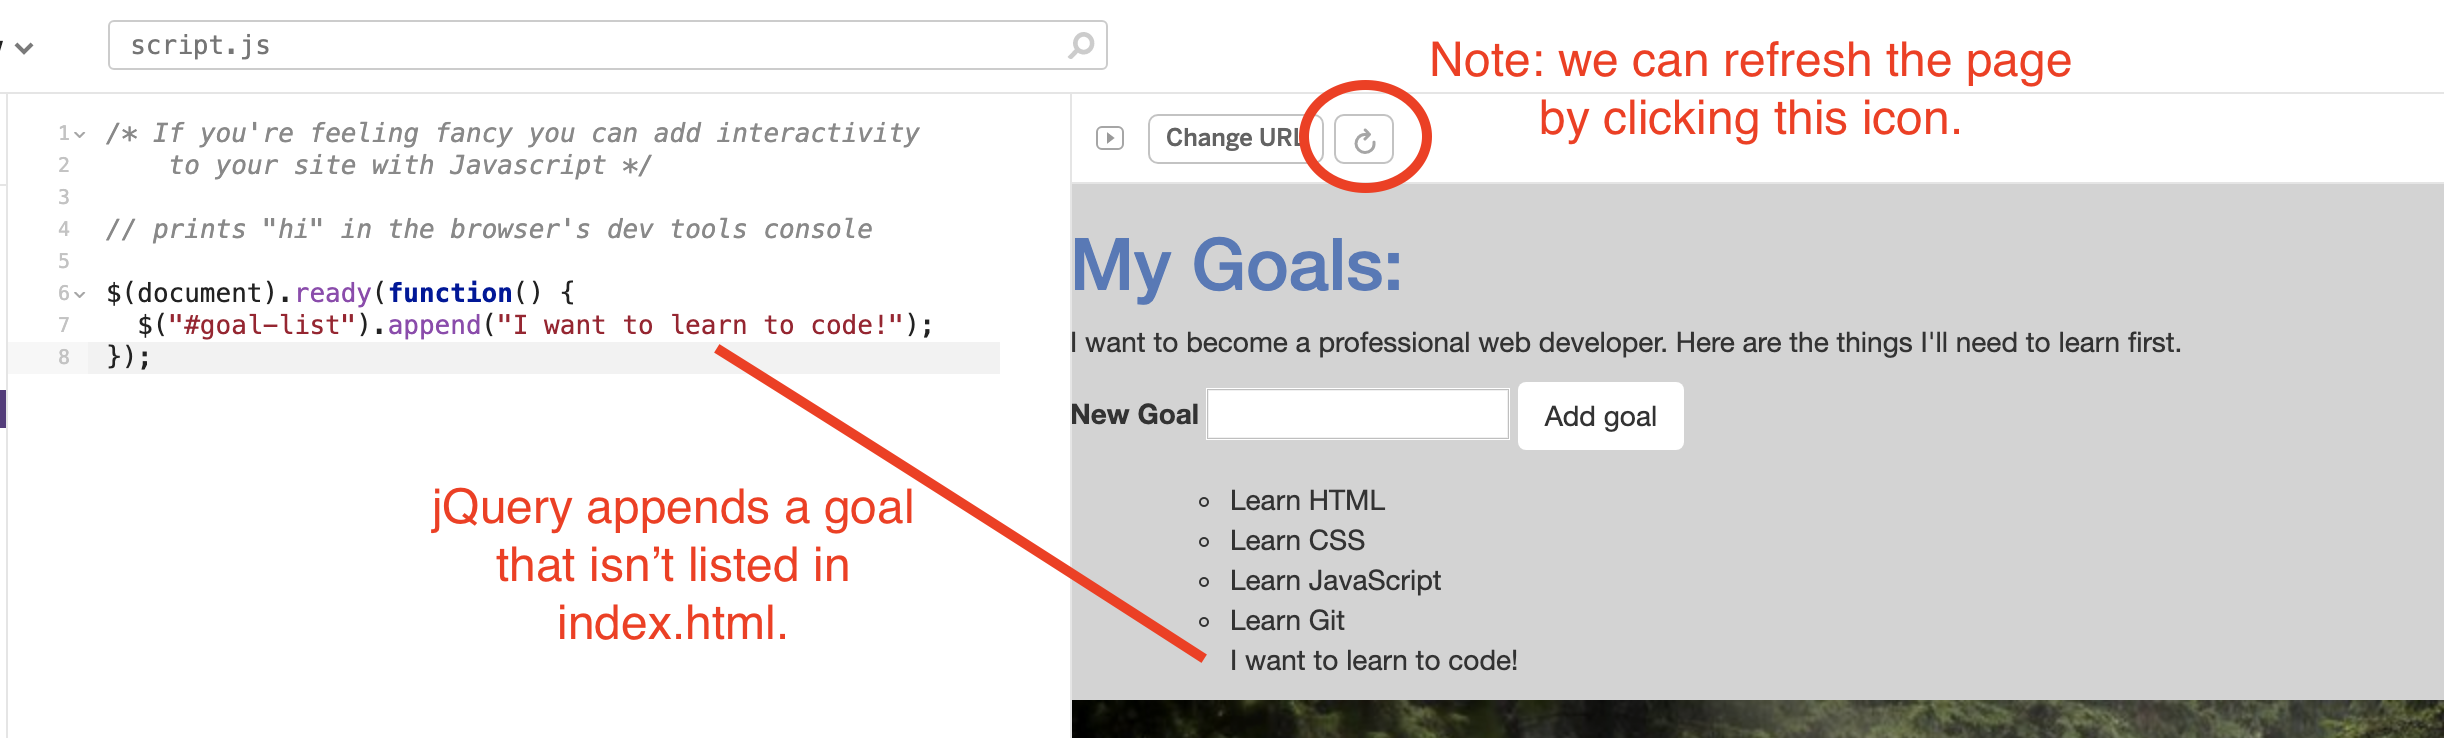
We now have a new item at the bottom of our list of goals. This item isn't included in our HTML. Instead, we used jQuery to append it to the list.
Note: If your site isn't updating, click on the refresh icon just above the preview of the website we're building. The icon is also indicated in the image above.
One little thing: wouldn't it be nice if our new item was also an <li> like the other items on the list? Well, we can do that with a small update to our code:
$(document).ready(function() {
  $("#goal-list").append("<li>I want to learn to code!</li>");
});
We just need to add <li> tags to make it a list item.
However, we haven't actually added any interactivity yet. This is pretty much the same thing as just adding an element directly to the HTML. We need the form itself to trigger the append() function.
Adding a click() Function
Let's attach a click() function to our form button. A click() function does exactly what it sounds like: when a thing on our site is clicked, all the code inside the click() function will run.
We can use jQuery to attach a click() function to our button. Then, when someone clicks the button, we can run some code to append() things to our list.
Let's update our script file to look like this:
$(document).ready(function() {
  $("#goal-button").click(function() {
    $("#goal-list").append("<li>I want to learn to code!</li>");
  });
});
Here, we've added a new jQuery function.
- We use the
$to indicate we are using jQuery. - Then we target the element with an ID of
goal-button. That's the button on our page. - We attach a
click()function to#goal-button. Note that theclick()function isn't called right away. If the HTML is like a blueprint used to build a virtual house called the DOM, then jQuery is the electrician that comes in after the house is built to install a light switch. Once again, that's why it's important for our script to wait for the DOM to be built - otherwise, jQuery can't come in and add theclick()function. - We've moved our
append()function inside of theclick()function. That way, the code will only run when the button is clicked.
Let's see how this looks in Glitch:

The image shows how our page will look if we keep clicking the button. Our site has a little interactivity now! We can click the button to add "I want to learn to code!" to the screen. However, it's not quite the interactivity we'd like.
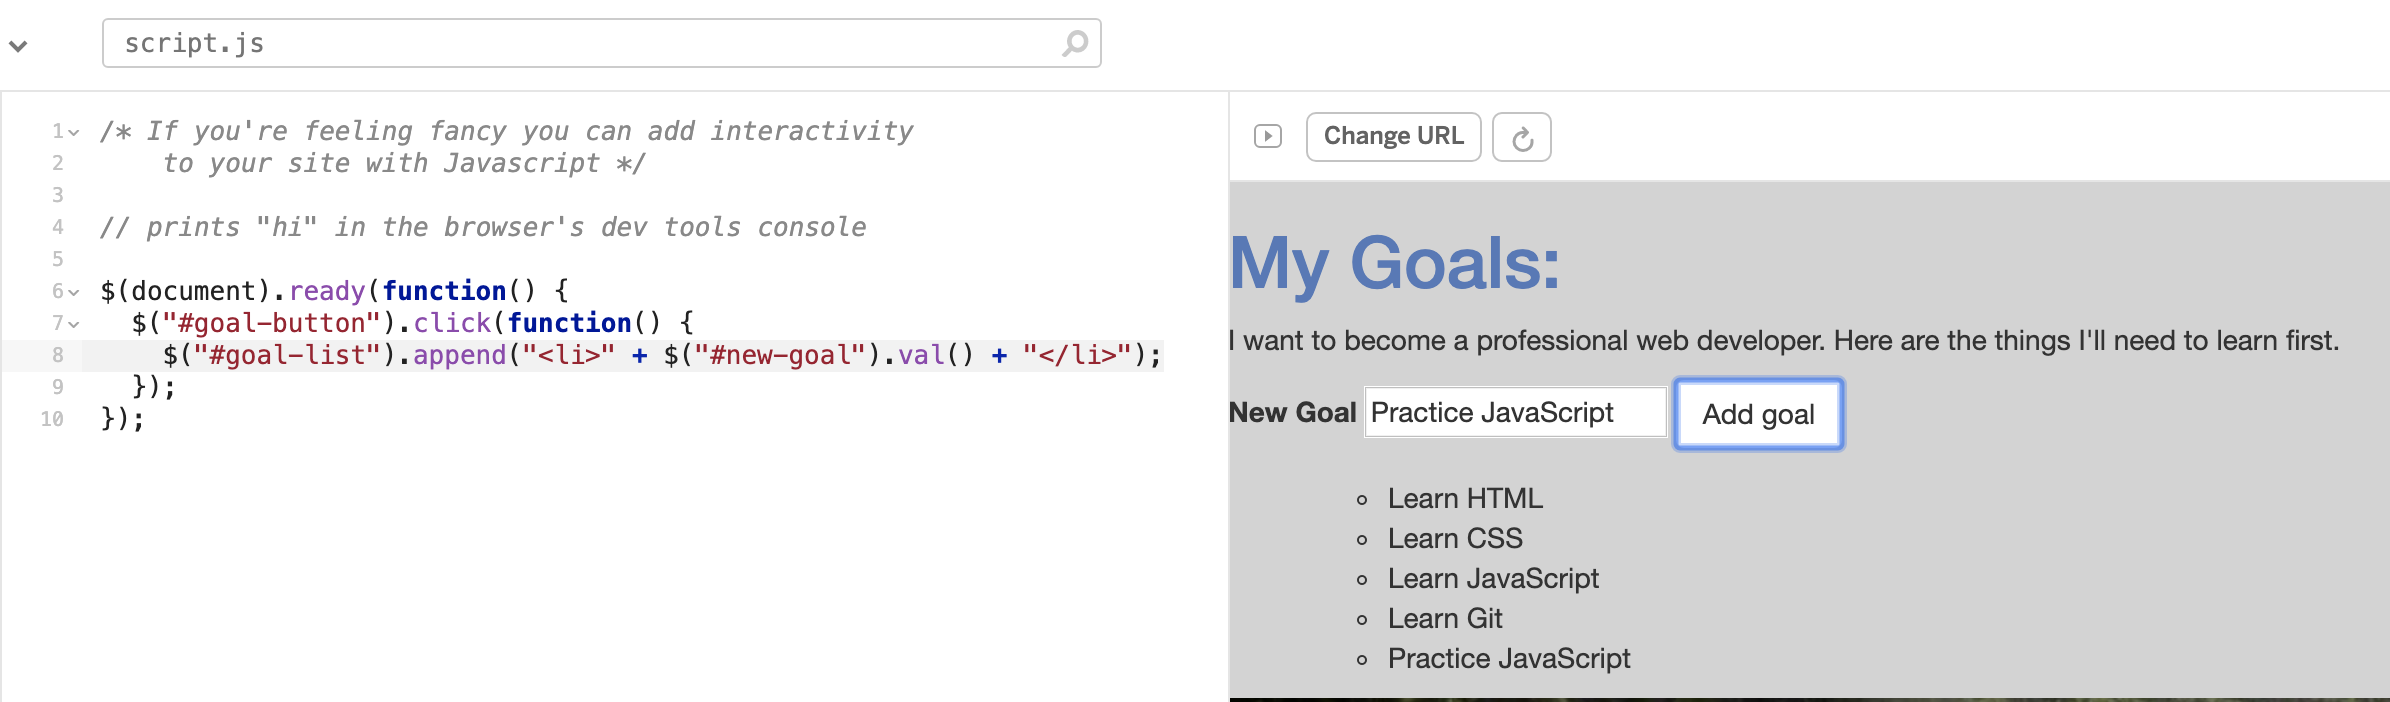
Fortunately, jQuery provides a function called val(). This function can be used to see the value of a form field. Let's update our code to use this function:
$(document).ready(function() {
  $("#goal-button").click(function() {
    $("#goal-list").append("<li>" + $("#new-goal").val() + "</li>");
  });
});
We've made a few changes to our append() function:
$("#goal-list").append("<li>" + $("#new-goal").val() + "</li>");
- We use jQuery to call
$("#new-goal").val(). This finds the value in the form field with an ID ofnew-goal. - We use concatenation to combine opening and closing list item tags to the value that jQuery has found for us. This ensures that anything we append to our list is also a list item.
Now we can actually add items to our list. Every time we click the button, our function is activated and the value of the form field is appended.
There's one more thing we can do to clean this up a bit. It would be nice if the form field was cleared after submission for users. Fortunately, this is easy. We can also use the val() function to clear the field. We just need to add one more line to our script:
$(document).ready(function() {
  $("#goal-button").click(function() {
    $("#goal-list").append("<li>" + $("#new-goal").val() + "</li>");
    $("#new-goal").val("");
  });
});
The line $("#new-goal").val(""); simply empties the form field so the user may enter another goal into the form. Try it out on Glitch!
Additionally, if we wanted our text styling to match what we have for .list-item in style.css we can update your jQuery created list to look like this: $("#goal-list").append("<li class='list-item'>" + $("#new-goal").val() + "</li>");.
JavaScript is Tough
Great work so far! We've built an interactive site that uses HTML, CSS, JavaScript, and jQuery. We could easily spend months focusing on each of these topics because there is so much to learn. We'd also like to note that JavaScript and jQuery are very challenging at first. Don't worry if you don't fully understand everything we just completed. That's entirely normal. Our full-time Introduction to Programming students spent many weeks learning and practicing these concepts. If you're interested in developing your JavaScript skills further, we'll provide a list of resources in the last lesson of this workshop.