📓 4.2.3.3 Planning Our Application: Part 3
We can now successfully create tickets and view the queue. So far, our TicketControl component handles all state in our application. It includes local state (determining whether the form or the ticket list should be showing) and shared state (our main ticket list).
At this point, we have CREATE functionality as well as READ (all) functionality, so we are almost halfway to making a functional CRUD application. In this lesson, we'll plan out a TicketDetail component. Users will be able to click on a ticket to see its detail. That will give us complete READ functionality.
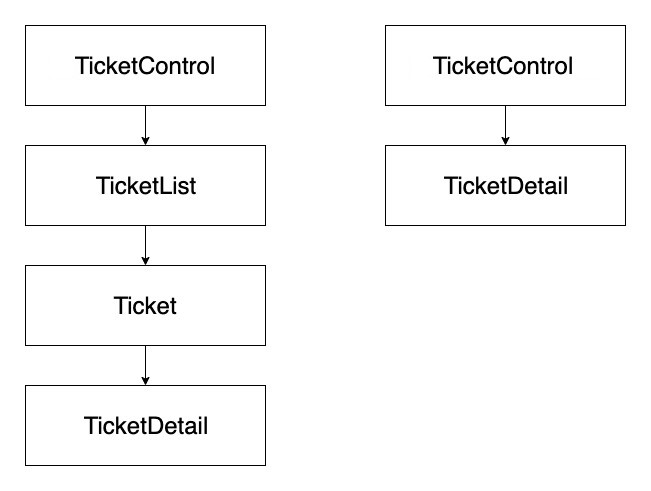
First, we need to think about where our TicketDetail component should go in our component diagram. It may be tempting to place it below our Ticket component. After all, isn't it almost the same thing? However, we will be making our coding lives more complicated if we have to go through the Ticket component to access TicketDetail. The following picture illustrates why:

Let's start with the diagram on the left. If TicketControl holds our shared state, it would need to be passed through TicketList and Ticket before it reaches TicketDetail. That's a lot of props. There's a term for passing props through many components: prop drilling. If possible, it should be avoided — after all, the more components that have to pass down props, the more places our application could break down.
Meanwhile, in the diagram on the right, if we just pass data from TicketControl to TicketDetail, we avoid prop drilling altogether. TicketControl already handles shared state. It also has local state that determines which component should be showing.
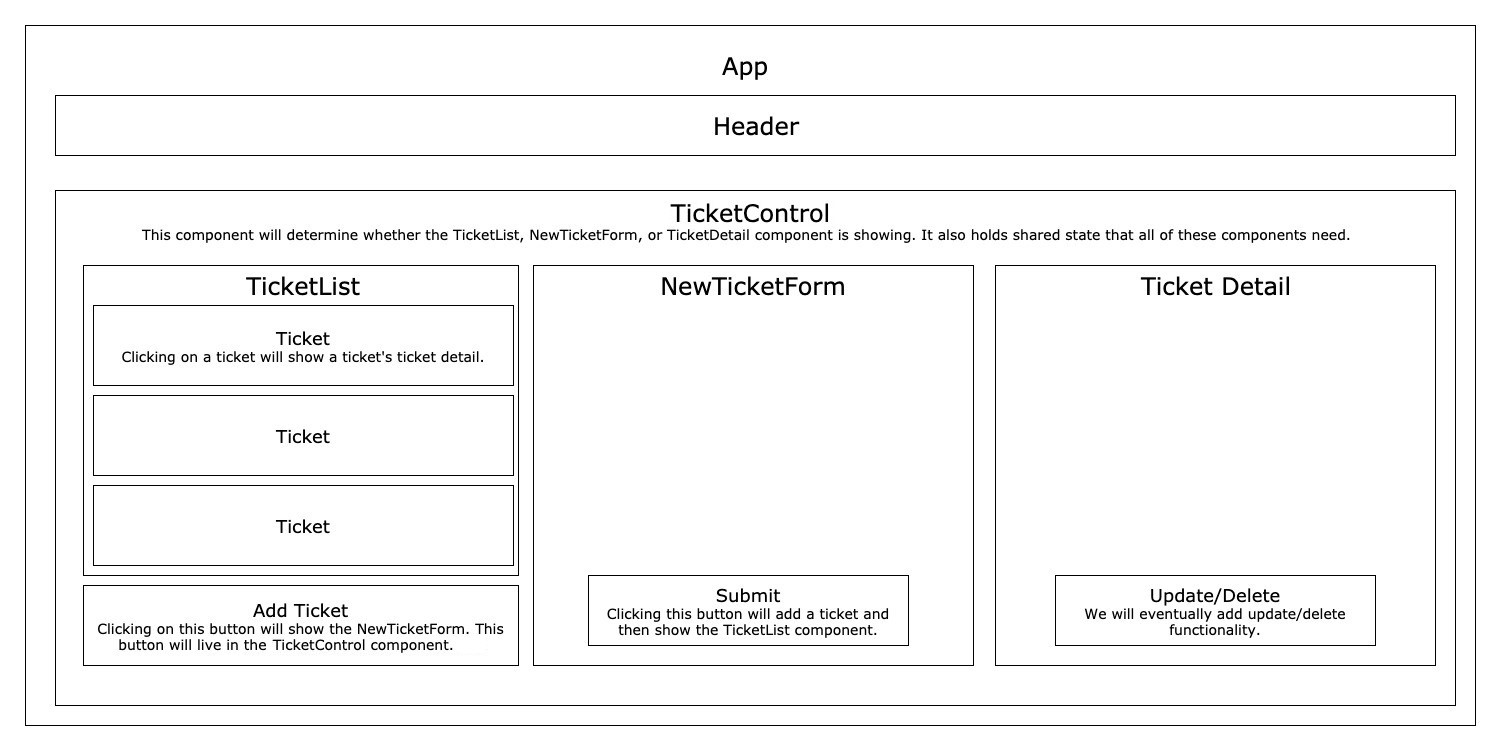
For that reason, we can make our lives easier by updating our component diagram to look like this:

TicketControl will be able to pass props and state directly to TicketDetail. TicketControl also already has conditional rendering so we will just need to add one more conditional to determine whether TicketDetail should render instead of TicketList or NewTicketForm.
We will also need to add some new local state to TicketControl. Don't worry about making this change right now, but in the next few lessons the default state of the TicketControl component will be updated to look like this:
this.state = {
  formVisibleOnPage: false,
  mainTicketList: [],
  selectedTicket: null
};
We'll add a third piece of state called selectedTicket which begins as null. If you are working along with the lesson, you don't need to add this code yet — we will go over it again in the next lesson.
If a user clicks on a ticket, selectedTicket will be updated to the correct ticket — and the TicketDetail for that ticket will show.
Each of these properties is a state slice. A state slice is a piece of state that can be mutated independently of other state slices.
Our first state slice determines whether or not a form should show on the page. It is local state.
Our second state slice holds the list of all tickets. It is shared state.
Our third state slice will determine whether our TicketDetail component should show or not.
We are almost ready to add functionality so a user can click on a specific ticket and go to its detail page.