📓 1.3.1.4 forEach Loops
In the last lesson, we wrote our first Array.prototype.forEach() loop. In this lesson, we'll continue to practice this kind of loop. By the end of the lesson, you should have a basic understanding of how to write and apply an Array.prototype.forEach() loop. If you don't, we recommend reading the lesson again. Don't worry — you don't need to be a master of looping just yet. It's a complex enough concept that it can take time to master. Focus on having a growth mindset, be patient with yourself, and trust that it will make more sense with practice.
More Examples of Looping with `Array.prototype.forEach()
Logging Values to the Console
Let's start working with numbers instead of alerts. Our first example will just double numbers from an array and then log the doubled value to the console.
> const array = [0,1,2,3,4,5];
> array.forEach(function(number) {
  console.log(number * 2);
});
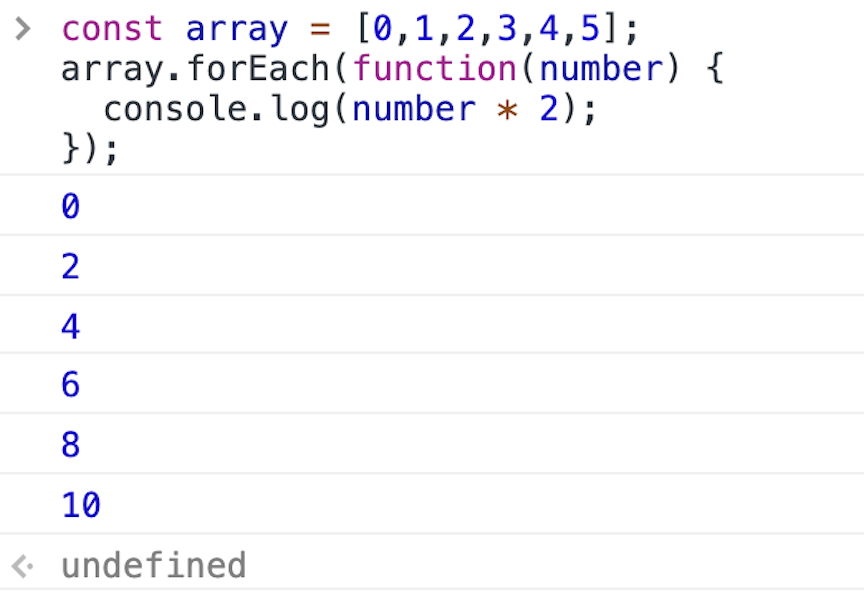
In the example above, our loop calls the anonymous callback function six times — once for each element in the array. Try it out yourself in the DevTools console.

The first time through the loop, the callback (function(number) { console.log(number * 2); }) is executed on the first element in the array. The first element is 0, and 0 * 2 is 0, which is logged to the console.
The second time through the loop, the callback is executed on the second element in the array. The second element is 1, and 1 * 2 is 2, which is logged to the console.
And so on.
Note that in the image above, the last line in the console reads undefined. That's because the return value of an Array.prototype.forEach() loop is undefined. It's really important to understand this. Because Array.prototype.forEach() does not return anything (hence undefined), we can't store the results of Array.prototype.forEach() in a variable, something like this:
// this does not work!
> const array = [0,1,2,3,4,5];
> const doubledArray = array.forEach(function(number) {
  return number * 2;
});
Creating a New Array with Modified Elements
So what if we actually want to store the return values of each element in the array? This is a bit more involved. We need to create another array to hold the doubled values. Then we can use the loop to put the doubled values in the array.
Here's how we can do it:
> const array = [0,1,2,3,4,5];
> let doubledArray = [];
> array.forEach(function(element) {
  doubledArray.push(element * 2);
});
> doubledArray;
(6) [0, 2, 4, 6, 8, 10]
We create an empty array where the doubled numbers will go. For clarity's sake, we name it doubledArray. Note that the original array is a const while doubledArray uses let. The original array is not altered. Instead, doubled values will be pushed into the new array.
Next, we loop through our original array. We've changed the parameter in the callback to element instead of number. You can call it whatever you wish — it's just a parameter. However, because a loop iterates through each element in an array, element is a common parameter to pass into a loop's callback.
Finally, we push the doubled value into doubledArray. Once the loop is finished, we can see that doubledArray contains all of the doubled elements.
If we want to modify all the elements in an array and save the results using Array.prototype.forEach(), this is how to do it. We will learn another, cleaner way to do this when we learn about Array.prototype.map() in a future lesson.
Using a Loop to Sum Numbers
Let's use a loop for a different kind of operation. This time, we will add all the elements in the array instead. Let's take a look:
> const array = [0,1,2,3,4,5];
> let sum = 0;
> array.forEach(function(element) {
  sum += element;
});
> sum;
15
Our original array remains a const. Our loop won't ever change it!
Next, we have a sum instead of a doubledArray. It's not an array — it's a number. Whenever we want to initialize a variable that adds things together, we'll usually start at 0.
We loop through each element in the array, calling sum += element;. This is shorthand for the following:
sum = sum + element;
This is another place where things can get really confusing for beginners. This looks like a math problem from algebra. If it were a math problem, element would have to be zero. There's no other way to make both sides of that equation work!
But this isn't a math problem here — it's computer programming. And yes, we are asking our little program to do math, which can compound the confusion. But this is what we are actually doing in the line above:
// This is pseudo-code!
newSum = oldSum + element;
We are telling JavaScript to take the value of our sum variable (called oldSum in our pseudo-code example) and add the value of element to it.
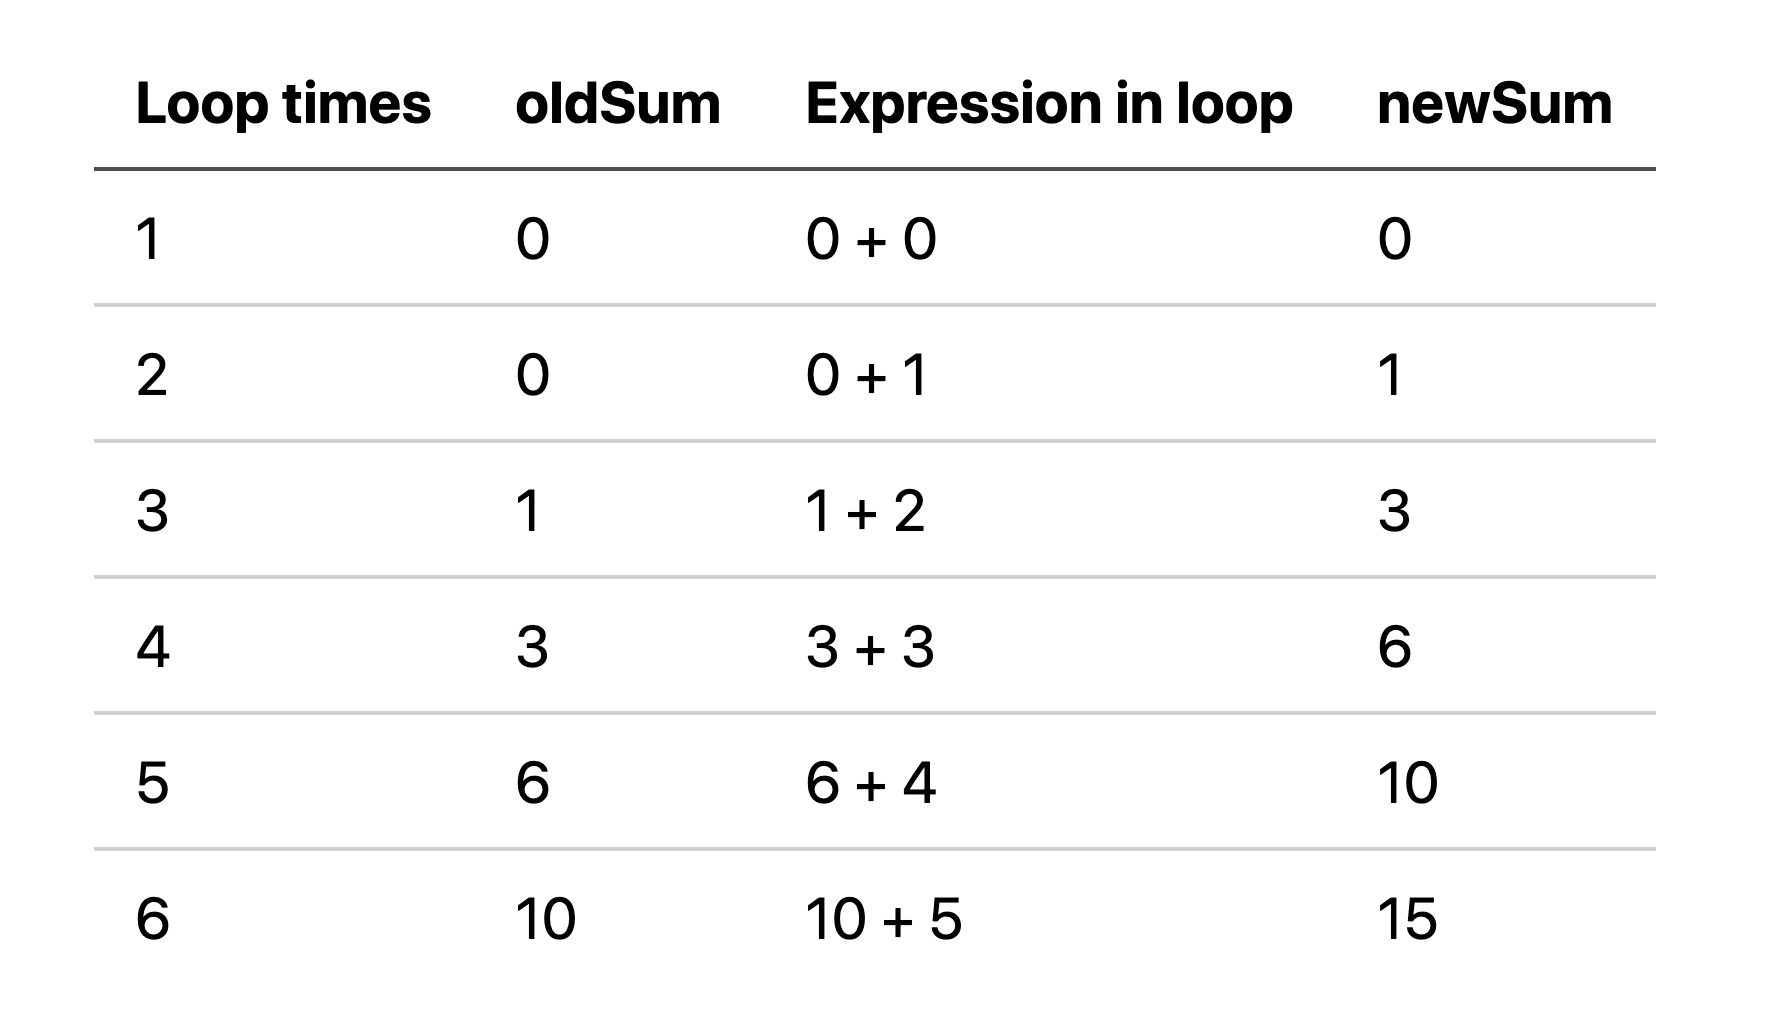
Here's how this looks each iteration through the loop:

In the table above, the first column denotes the number of times the loop has run. The second column is the value of sum when that iteration begins — what we called oldSum in our pseudocode. The third column shows what is being evaluated during that iteration of the loop. Finally, the last column shows the value of what we call newSum in our pseudocode — which is the value after the code in that iteration has run.
Using debugger; to Study Variables During a Loop
It may also help to study exactly what is happening in the DevTools console. Refresh your browser and then input the following code into the console:
> const array = [0,1,2,3,4,5];
> let sum = 0;
> let oldSum;
> let newSum;
> array.forEach(function(numberToAdd) {
  debugger;
  oldSum = sum;
  sum = oldSum + numberToAdd;
  newSum = sum;
});
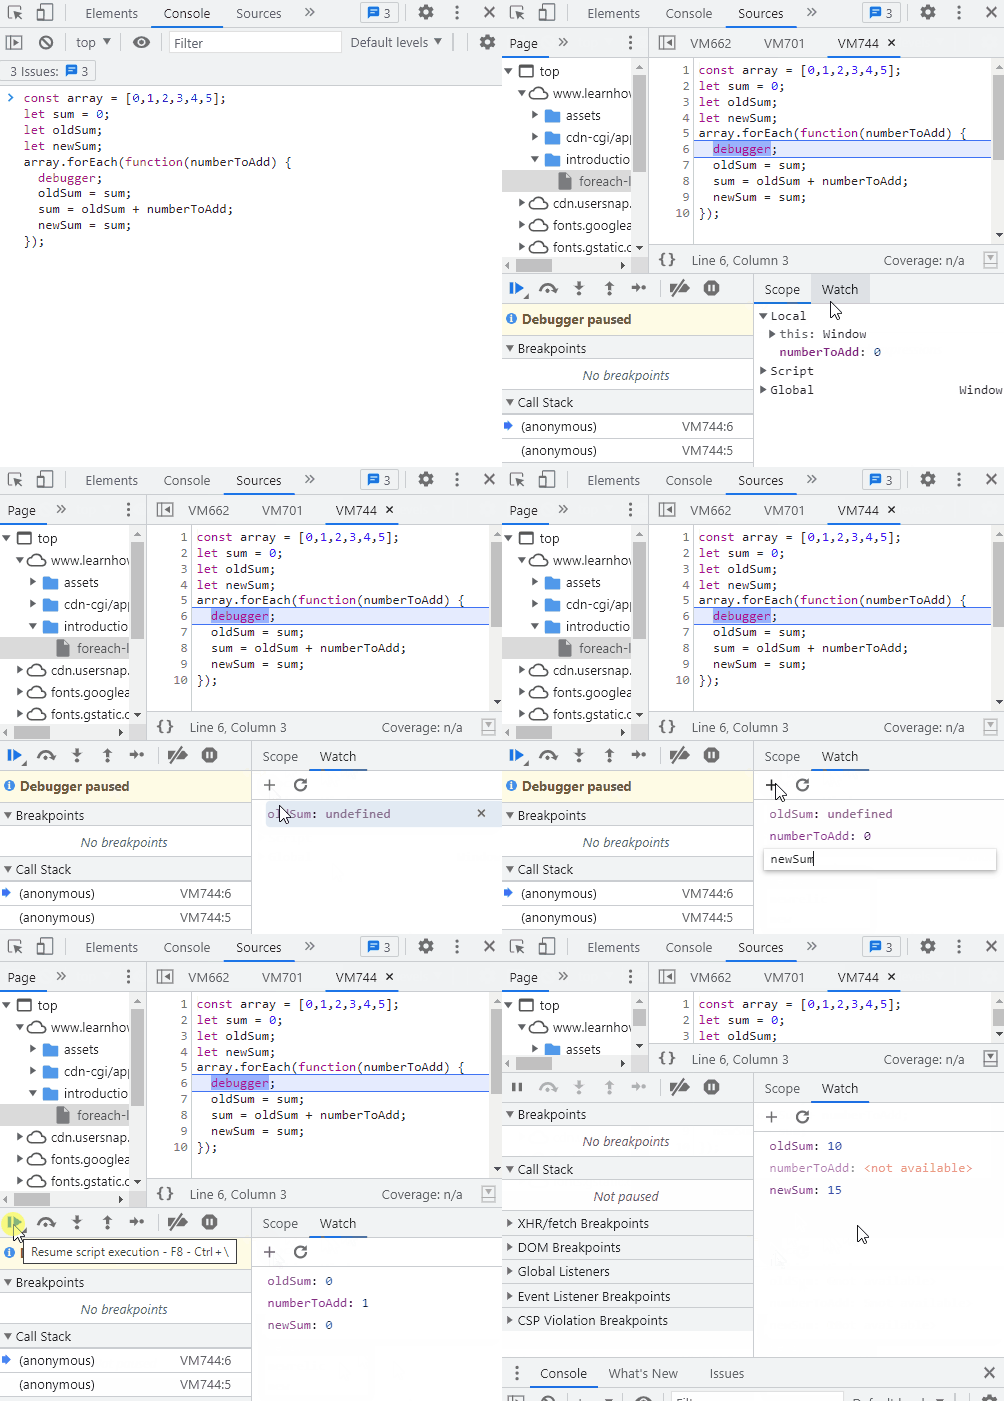
Note that we've added a debugger; statement to freeze execution just inside the loop. (Yes! We can in fact use debugger; statements in the code we add to our DevTools console.) We've also renamed element to numberToAdd — and added oldSum and newSum variables. These variables are there so we can look at exactly what's happening. Run this code in the console by hitting Enter and then go to the Sources tab.
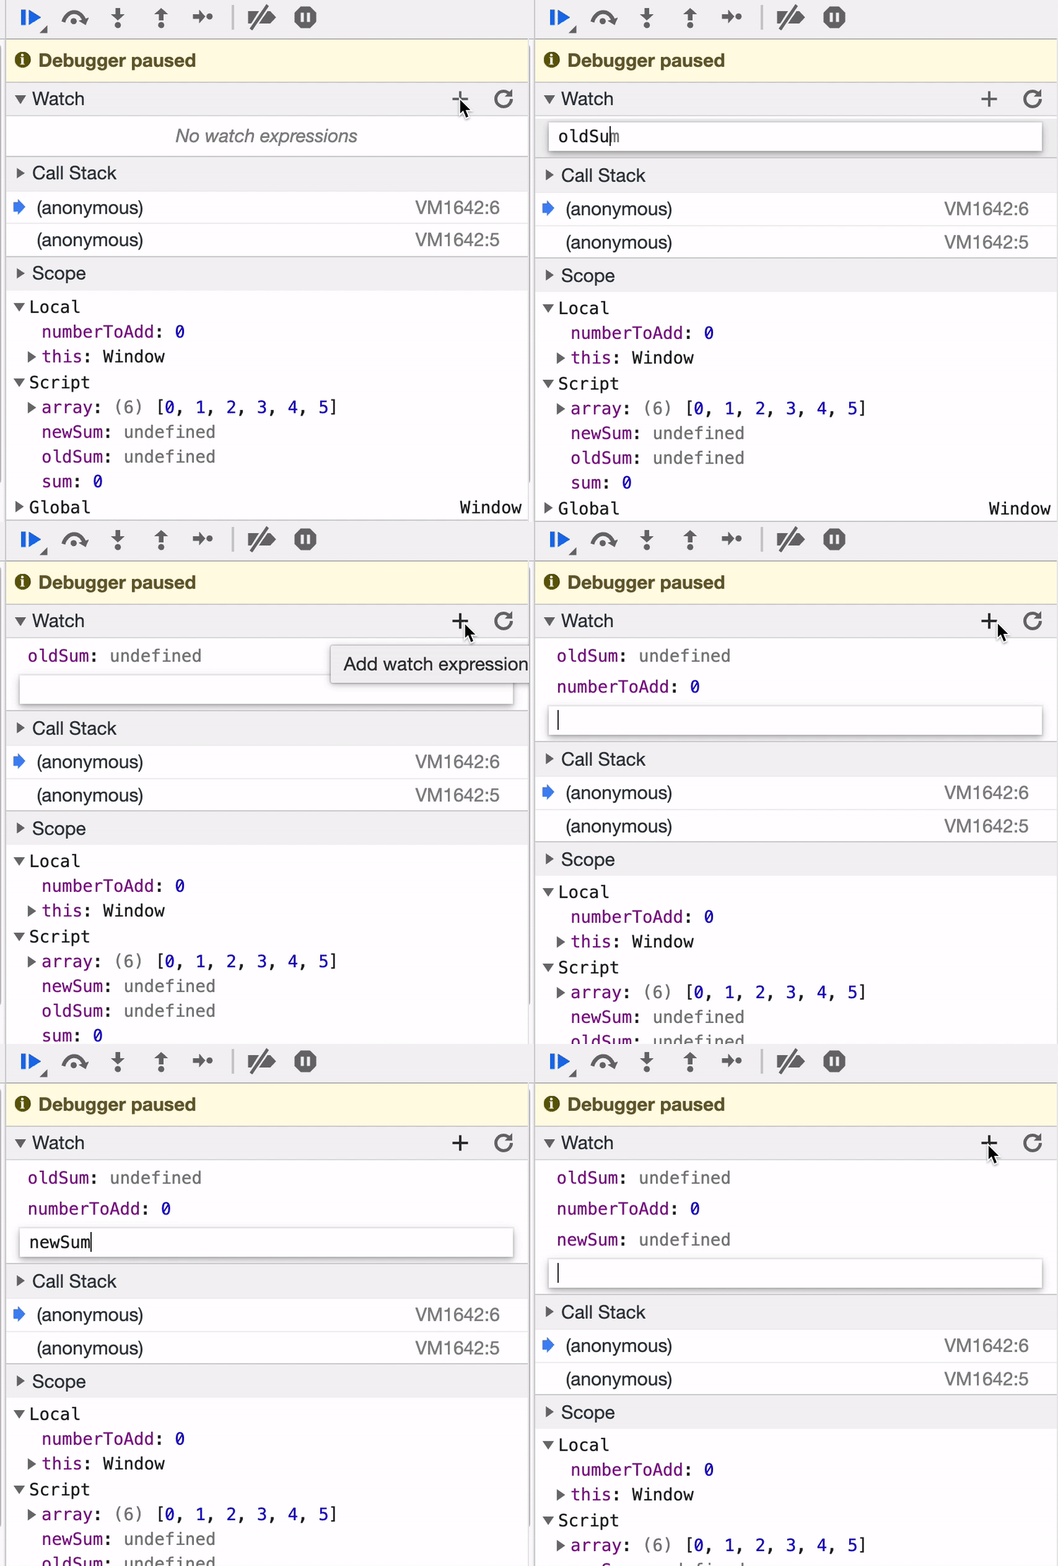
Before we step through our code, we are going to make sure we're watching our new variables. Let's add a new tool to our Chrome DevTools repertoire:

In the right-hand pane, we can click Watch to add variables we want to watch the values of. Note that these values are also available in the Scope section in the same pane. The benefit of Watch is that we can manually make sure we are watching the value of variables as they come in and out of scope. You should take advantage of both of these features when you are debugging!
Next, we can step through our code by clicking the blue arrow. When our code is executed, each time the debugger; statement is reached, the code will pause. That means the code will pause six times in all — once for each iteration through the loop. Take a look at how the values change with each iteration.

While the GIF above can be helpful, take the time to step through the function in the DevTools debugger at your own pace to make sure you are clear on what's happening. Note that you'll need to clear the console in between each time that you want to run the loop — that way, you'll clear let and const variables so they can be declared anew again. Otherwise, you'll get Uncaught SyntaxError: Identifier has already been declared.
Using a Loop to Make a String
As we can see, Array.prototype.forEach() is extremely powerful. We can use it for so many different things. We will run through a few more quick examples. Try them out in the DevTools console!
> let thingsILike = "I like...";
> const arrayOfThingsILike = ["bubble baths", "kittens", "good books", "clean code"];
> arrayOfThingsILike.forEach(function(thing) {
  thingsILike = thingsILike.concat(" " + thing + "!");
});
> thingsILike;
"I like... bubble baths! kittens! good books! clean code!"
A few things to note here:
- We are adding on to a string, not a number. That means
thingsILikeis a string. Often, we will initialize with an empty string"", but in this case, we have a string we want to start with:"I like...". - We concatenate the current element of the array (which we call
thing) to thethingsILikestring. BecauseString.prototype.concat()is not a destructive method, we have to save it in a variable. In this case, we're reassigning the value of thethingsILikevariable.
Using A Loop to Add Elements to the DOM
We can also use loops to run code to modify the DOM. Here's a hypothetical example using the things I like array. (The example is hypothetical because we aren't providing the HTML code to make this example work.)
> const arrayOfThingsILike = ["bubble baths", "kittens", "good books", "clean code"];
> const ul = document.querySelector("ul#likable-things");
> arrayOfThingsILike.forEach(function(thing) {
  const li = document.createElement("li");
  li.append(thing);
  ul.append(li);
});
Here, we are looping through the same array from the arrayOfThingsILike example above. The key difference is that each time through the loop we are creating a new list item element, appending the string of the thing I like as its value, and then appending the list item to a unordered list with the id of likable-things on our webpage. As a result, we don't need to worry about storing likable things in a variable.
In an upcoming lesson, we'll see another example of updating the DOM with a loop when we learn how to use checkboxes.
We are really just scratching the surface here. There is so much you can — and will — do with loops. At this point, hopefully things are getting a bit clearer. If not, don't panic. Start by rereading the lesson. If things still aren't fully clear, stick with the growth mindset attitude and trust your learning process.
Naming Conventions
When choosing a name for the variables in your loop, it's good practice to use a plural for the array and the singular form of that word for the parameter of the callback function that's passed into Array.prototype.forEach().
> const languages = ['HTML', 'CSS', 'JavaScript'];
> languages.forEach(function(language) {
    alert('I love ' + language + '!');
  });
The array is named languages and the parameter in the callback function is the singular language.